The Entrepreneur Forum | Financial Freedom | Starting a Business | Motivation | Money | Success

Welcome to the only entrepreneur forum dedicated to building life-changing wealth.

Build a Fastlane business. Earn real financial freedom. Join free.

Join over 80,000 entrepreneurs who have rejected the paradigm of mediocrity and said "NO!" to underpaid jobs, ascetic frugality, and suffocating savings rituals— learn how to build a Fastlane business that pays both freedom and lifestyle affluence.

Free registration at the forum removes this block.

How To Install Ruby2D on Windows (Game Programming)

rpeck90

Gold Contributor
Speedway Pass
User Power
Value/Post Ratio
442%
Nov 26, 2016
317
1,401
34
United Kingdom
This has nothing to do with business but I felt it may provide ideas for the game devs on the forum as well as potential insights for others (maybe you want to learn programming).

I recently discovered the "Ruby2D" library and decided to see if I could get it to build on my Windows system.

Although I love programming & software development, my experience with C/C++ is scant, so felt it would be a good way to see if I could gain some insight from trying to get it to work. The following will explain my progress.

As an aside, Ruby2D seems like a very simple way to create 2 dimensional software experiences. I would be partial to doing a tutorial on the mechanisms behind it, if people wanted to gain some insights into game dev (not that I'm an expert by any degree). My ambition would be to attempt to recreate the original "Doom" game, which was a 2D game with simulated perspective.

For the sake of brevity, this is a GIF of my system building the test app I created. The build process creates an EXE which can be used on other Windows systems (hence my interest): -

wg3RsNQ.gif


--

What Is Ruby and Ruby2D?

Ruby is a programming language created by Yukihiro "Matz" Matsumoto in the 90's.

It's most well-known for its use in the "Ruby on Rails" web application framework and has been adopted largely because of this.

There are a number of aspects to Ruby which make it a great programming language, especially for beginners: -
  • Object Oriented
    The entire language is built around objects.

    The reason this is important is that you don't have to worry about calling small and obscure functions to achieve simple functionality.

    For example, if we wanted to infer the name of a file in Ruby vs C, you'd use the "basename" function in both. However, using it in Ruby is a far simpler process than C: -
    Ruby:
    file_name = File.basename("/home/gumby/work/ruby.rb", ".*") #-> ruby
    PHP:
    file_name = basename("/etc/sudoers.d", ".d"); // -> sudoers
    C:
    file_name = basename("/etc/sudoers.d"); // -> sudoers.d
    Doesn't look that big of a deal, but considering "basename" is attached to the File class in Ruby, anywhere you have access to "File" (which is part of the core), you can call basename. For C, you need to include external library headers and PHP also has issues.

  • Simple

    Perhaps the most important aspect of Ruby is that it doesn't have semicolons.

    Although this may sound mundane, it's symbolic of the underlying virtue of the language - extremely forgiving and has a lot of inbuilt functionality to make its use as simple as possible.

    For example, if you wanted to declare a class and invoke it in Ruby, you'd do the following: -
    Ruby:
    class Test
        def initialize
            puts "Test"
        end
    end
    
    test = Test.new #-> will output 'test' to console

  • Canonical

    I'm not sure if this is the right word but I've read it somewhere and forgotten which it was.

    Ultimately, one of the things that makes Ruby stand out is how you're able to make it read like a sentence.

    This gives a lot of scope to making the system perform a range of different tasks without having to configure a huge number of different pieces of functionality. For example, if you wanted to declare a variable if a certain set of criteria is met, you'd use the following: -
    Code:
    variable = X.new if condition.is_met?
    Super simple and can be extrapolated ad infinitum.
-

Much like BASIC, Ruby gives programmers the ability to invoke objects and attach functionality to them.

Of course, this works similarly in C/C++ but the process is much more complicated and involved.

I can further extol the virtues of Ruby if people wanted - for now, I'll just say that it's an extremely effective language which has been used (again, thanks mainly to RoR) by the likes of Shopify, Github, Twitter, Stripe and a number of other web application companies.

-

Ruby2D is a library for Ruby...


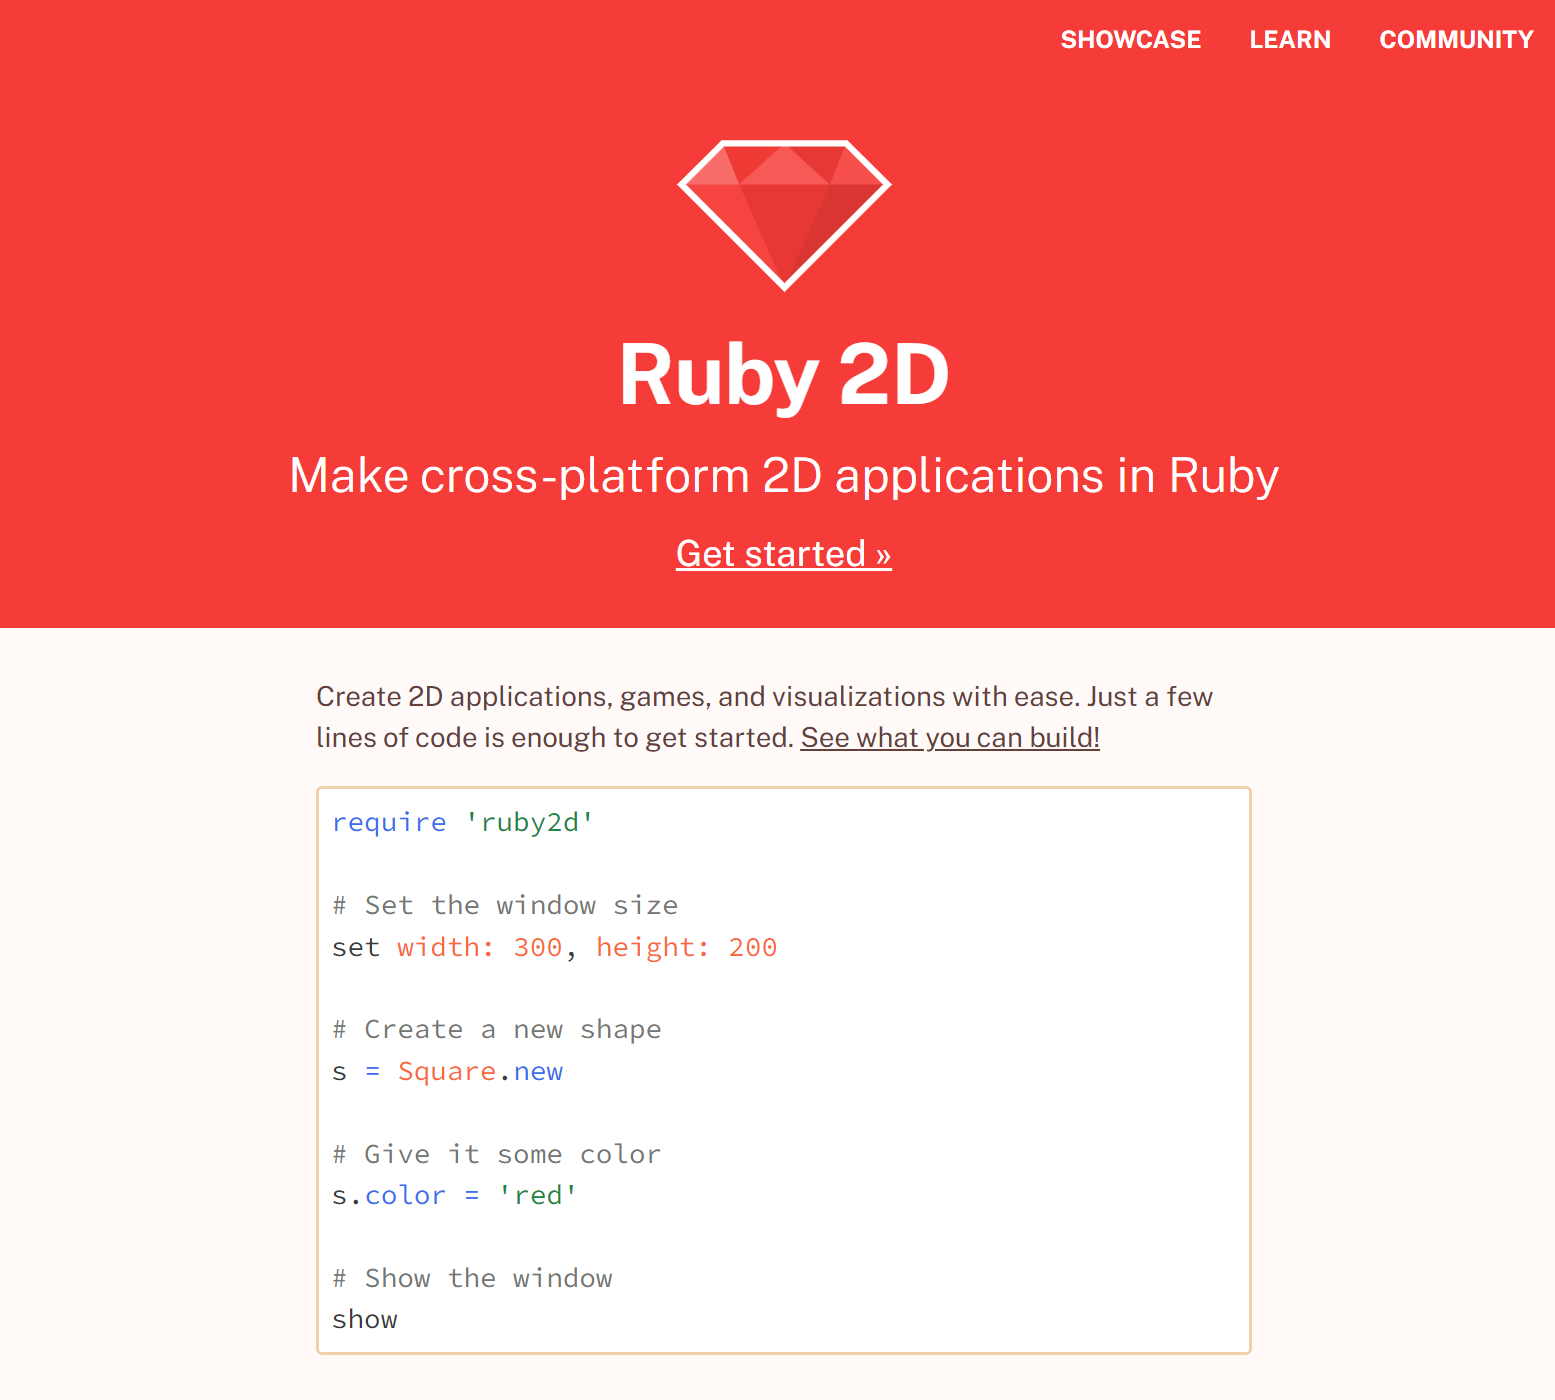
A library, in terms of software development, is a set of functionality you can include in an application to achieve specific results.

For example, if you wanted to develop a native Windows application which printed a document, you may include a library to help interface with the printer hooks in the OS. This would allow you to offload functionality to the library (rather than having to write it all yourself).

The Ruby2D library seems to be a wrapper for the "Simple2D" library.

Simple2D is written in C and compiled into DLL format when using on a Windows system. The Ruby2D gem seems to interface with this library, allowing you to harness its functionality with the simplicity and extensibility of the Ruby language.

I have no affiliation with it beyond having discovered it some days ago - you're able to add the following objects/elements to a Window: -
These can all be customized and managed inside a Ruby application, which can be run by using
Code:
ruby file.rb
from the command line.

A number of games/experiences have been created with it including: -
-

Building

Building / compiling applications is the difficult part and done at the behest of the system which you're using.

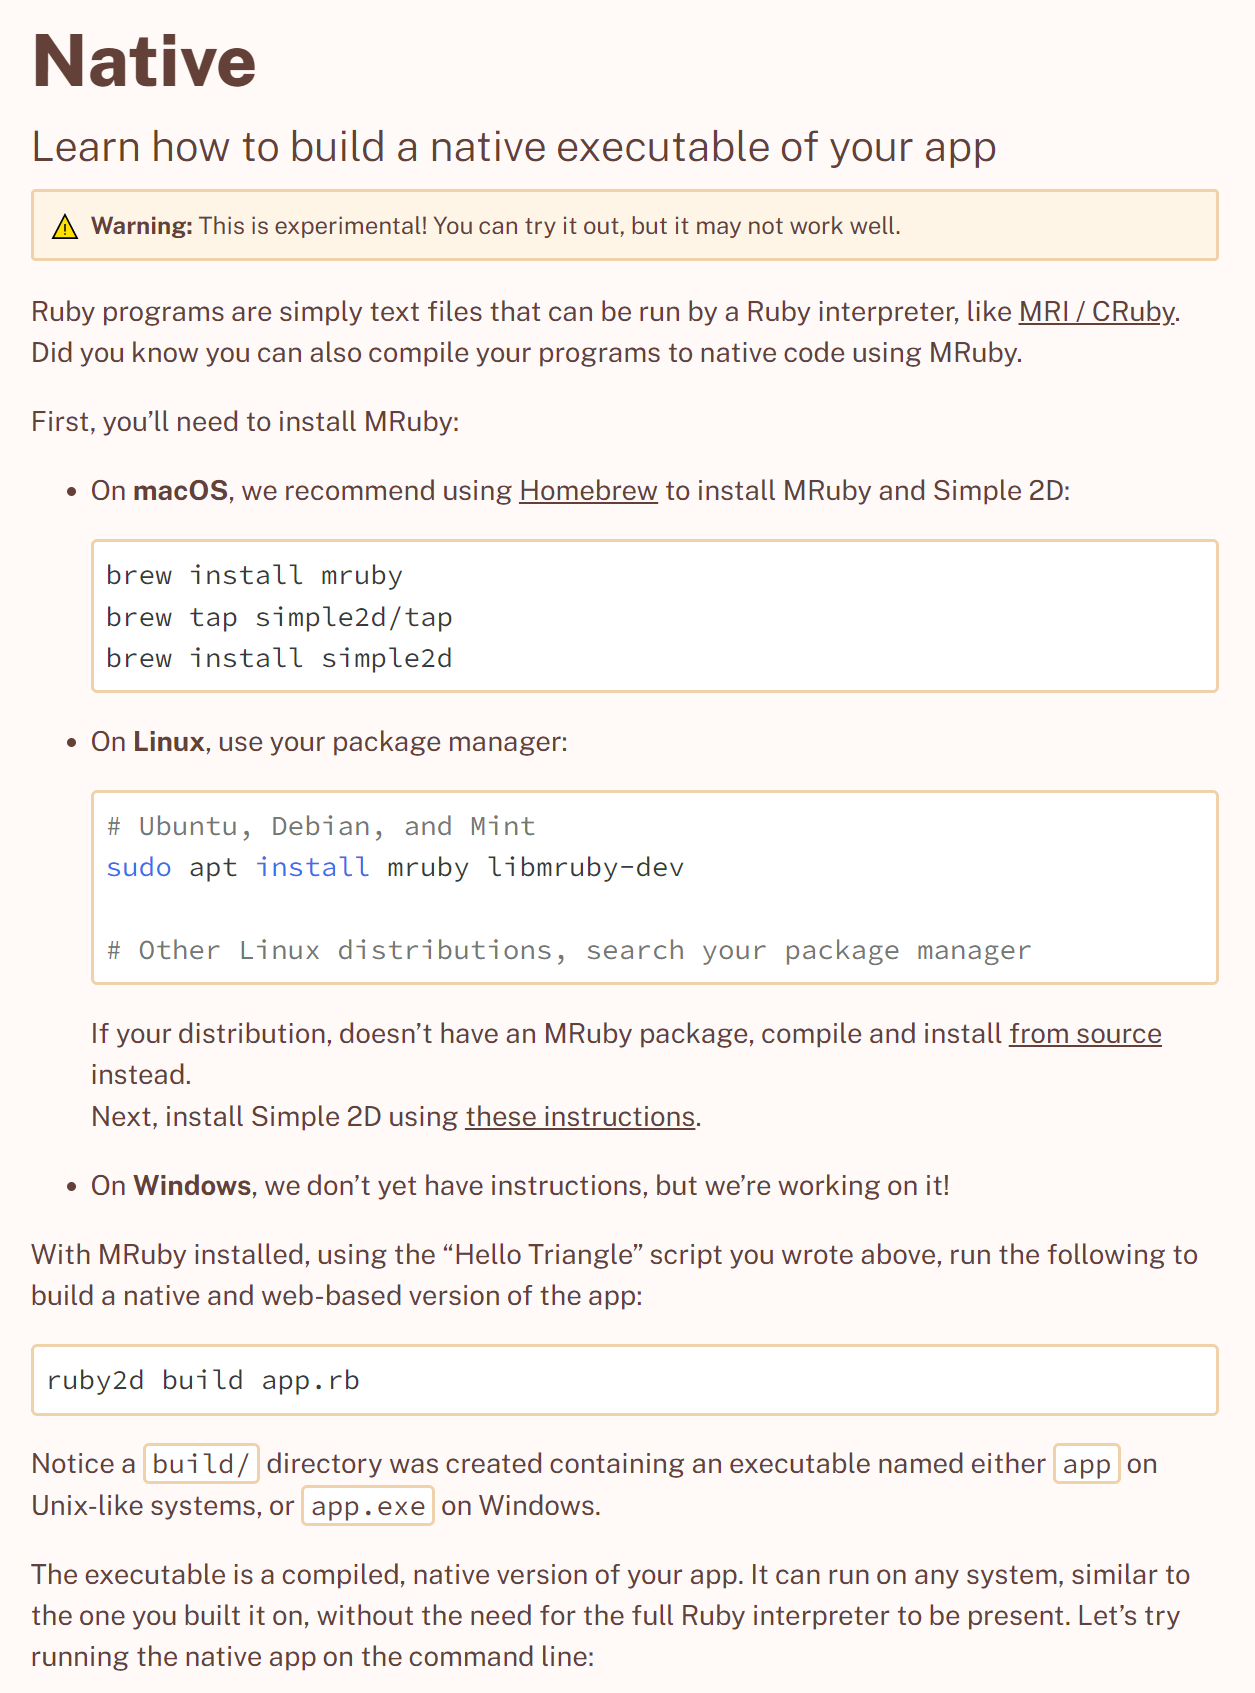
Due to the inability for the likes of PHP, Python or other "simple" languages to be compiled by default, it was interesting to me to see that Ruby2D had its own build pipeline. This makes use of MRuby, which we'll discuss later.

The importance of MRuby is that what you're actually doing with it is using Ruby as a "simple" interpreter for C - there is a lot of functionality missing from MRuby in order to get this to work cross platform.

Whilst this may be considered an issue, it means that you're able to use a build pipeline to create native applications that are coded in Ruby.

In the case of Ruby2D, MRuby is used to create a set of "build" functionality which allows us to deploy .exe applications on Windows (I've not used it on Linux or MacOS, although it could be compiled on there too).

To give an example of MRuby, this guy used it to build a game on Nintendo Switch, which I believe has now been pulled from the Switch store: -

View: https://www.youtube.com/watch?v=o0d4sjcUfCg&ab_channel=RubyKaigi

Ruby2D has a build pipeline which I'll discuss later. I had to hack this to get it to work on Windows, hence my writing this article...


-

What It Means

IF
you are interested in developing interactive GUI's which can run on native systems (Windows/Linux/Mac), I think this is a good way to gain experience in making it work. This goes beyond games - there is a lot of scope for "children's" learning apps, interactive native Windows experiences and more. Some of the old 2D apps my Dad bought me in the 90's could be built with it.

I would be interested in doing some sort of tutorial if people wanted it. I'm not an expert in C, so it may be a good way to help me gain experience.

For the next part of the article, I will explain how I managed to get it all to work/build on my system. Anyone involved with software likely has experienced issues with compiling/building apps, so detailing the issues I had to surmount may help others.

--

Installing Ruby, RubyGems and MRuby on Windows

Windows, as most developers will tell you, is extremely difficult to set up an adequate build pipeline.

The reason for this is a lack of central repository, meaning that you have to manually acquire and link the various libraries an application may require. This is tedious and often fraught with difficulty.

Fortunately, a number of projects, namely Chocolatey and MSYS, have been created to address this issue and, generally, do the job extremely well. I use MSYS2 as I picked it up after using RubyInstaller2 some time back.

I will explain how to set up MSYS2 with Ruby & MRuby below. After that, I will detail what I had to do to change the Ruby2D code to compile for a Windows environment. From there, if you want tutorial(s), we can look into that separately.

-

Installing Ruby

Ruby can be installed in a number of ways.

I originally wrote an article explaining that RubyInstaller is the best way to do it. I have since managed to get an MSYS2 version of ruby installed, which is far superior (for me). I'll explain both ways in case people need ideas.

The key (however you do it) is Windows requires a pre-compiled version of Ruby. Whilst you can compile it yourself, its much better to just install a pre-built version so that you don't need to worry about getting your environment sorted for it: -

RubyInstaller

RubyInstaller is a project aimed at providing pre-compiled versions of Ruby for Windows.


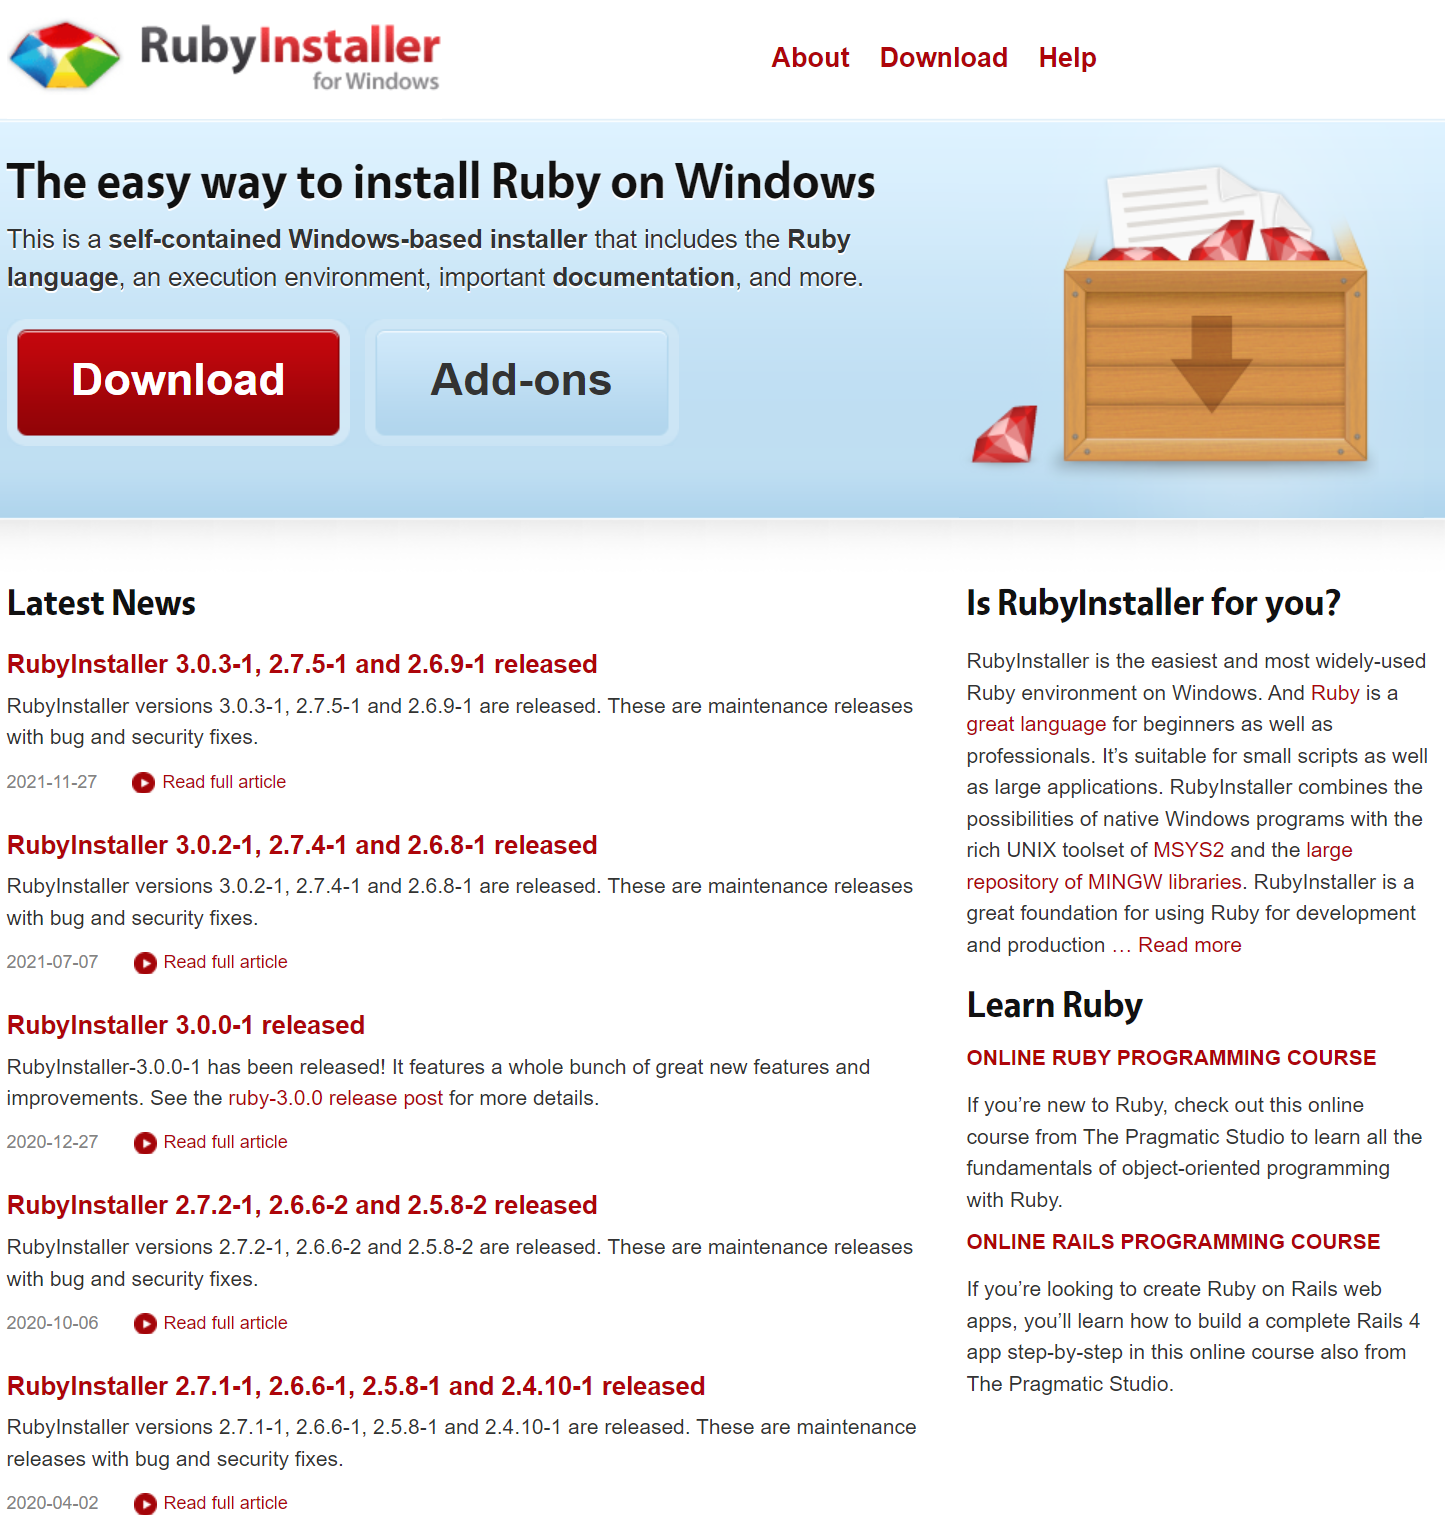
You can use either the "installer" version of RubyInstaller or the "zip" version.

The aim is to get the "ruby" command to work in CMD, which is slightly different depending on the version you use: -

ZIP (preferred)
  • Download the RubyInstaller ZIP file from here: -

    smFDpcK.png


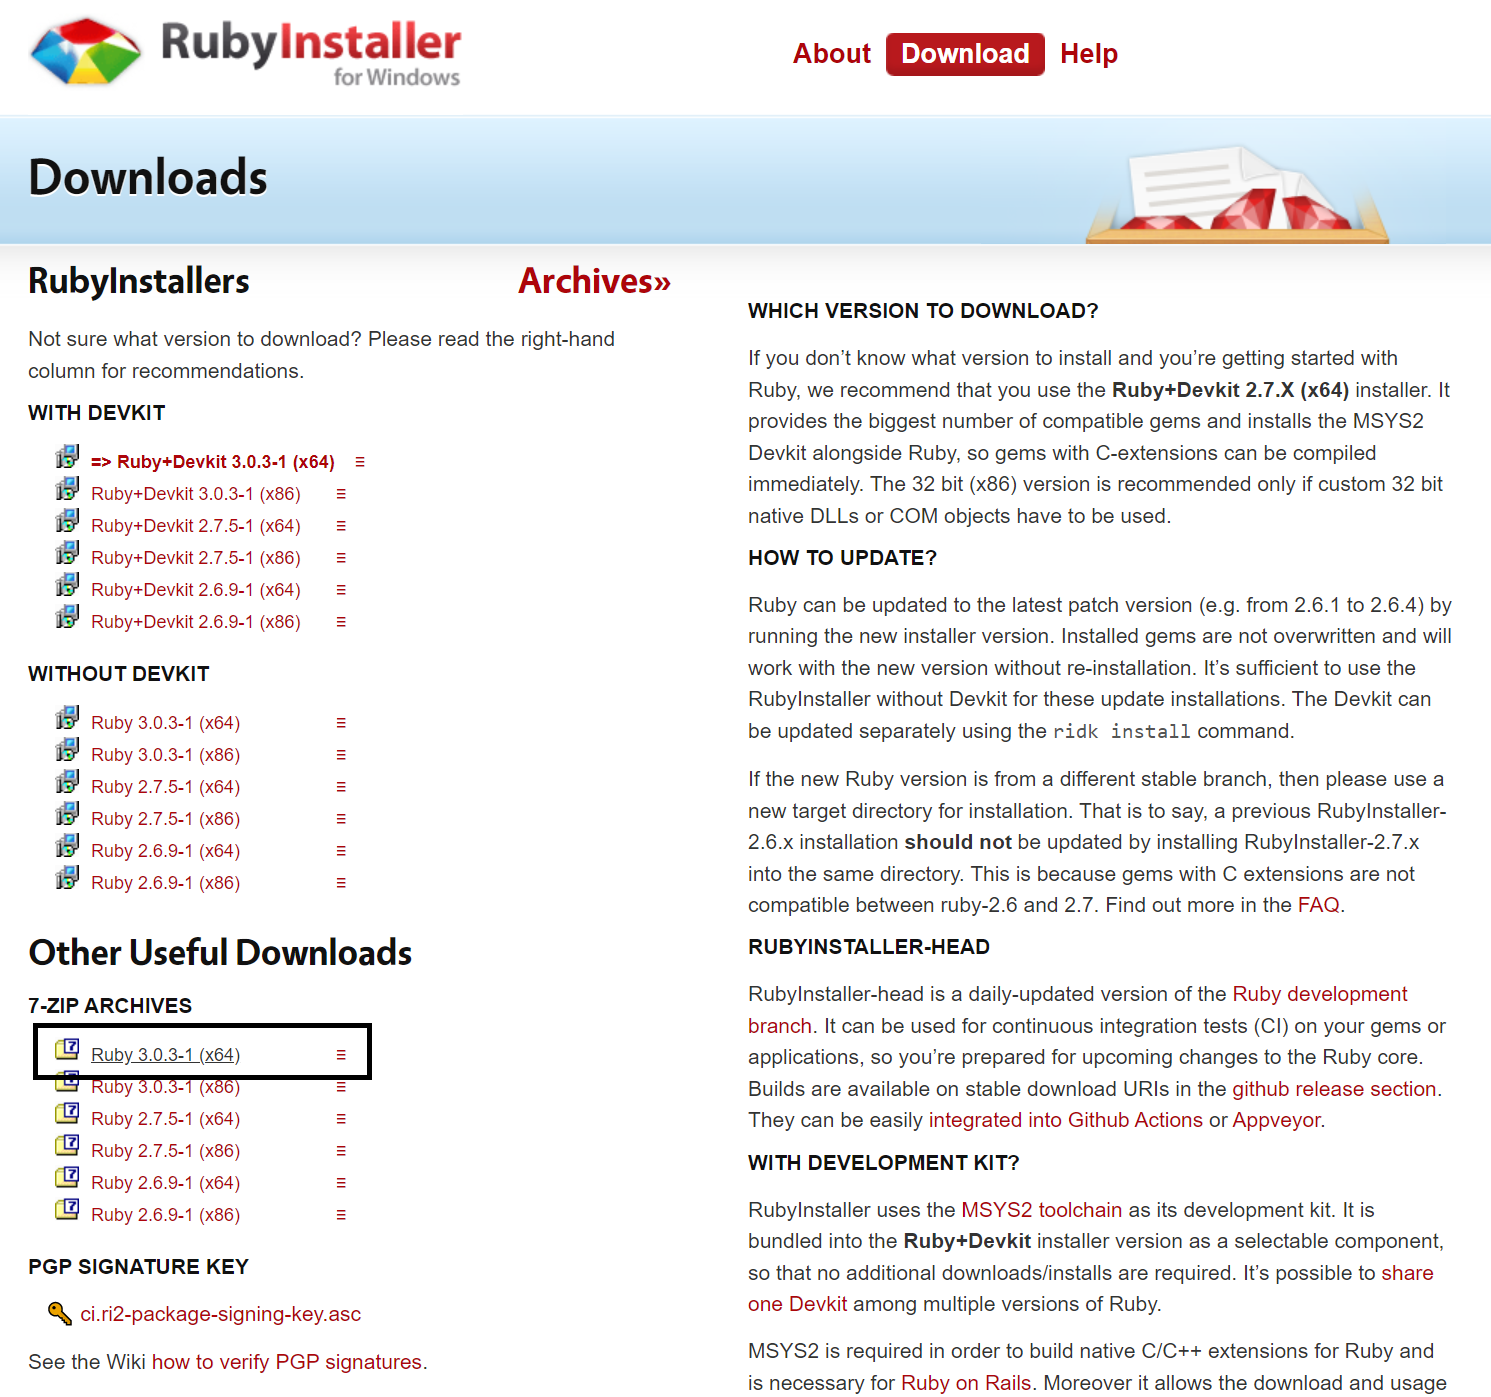
  • You may need to also download 7ZIP to read the file (not sure why they've archived it as .7zip)
  • Once it's downloaded, load the archive with 7ZIP and extract its contents to a folder on your hard drive
  • I tend to put it in C:/dev, which means the folder would be c:/dev/ruby-3.0.3-x86_x64 (or similar)
  • After doing this, you need to add the "bin" directory of this folder to your system PATH (see "Environment Variables" below)
If you add the correct folder to the PATH, you should be able to call "ruby -v" from cmd and it will respond with the version number.

Installer (not preferred)

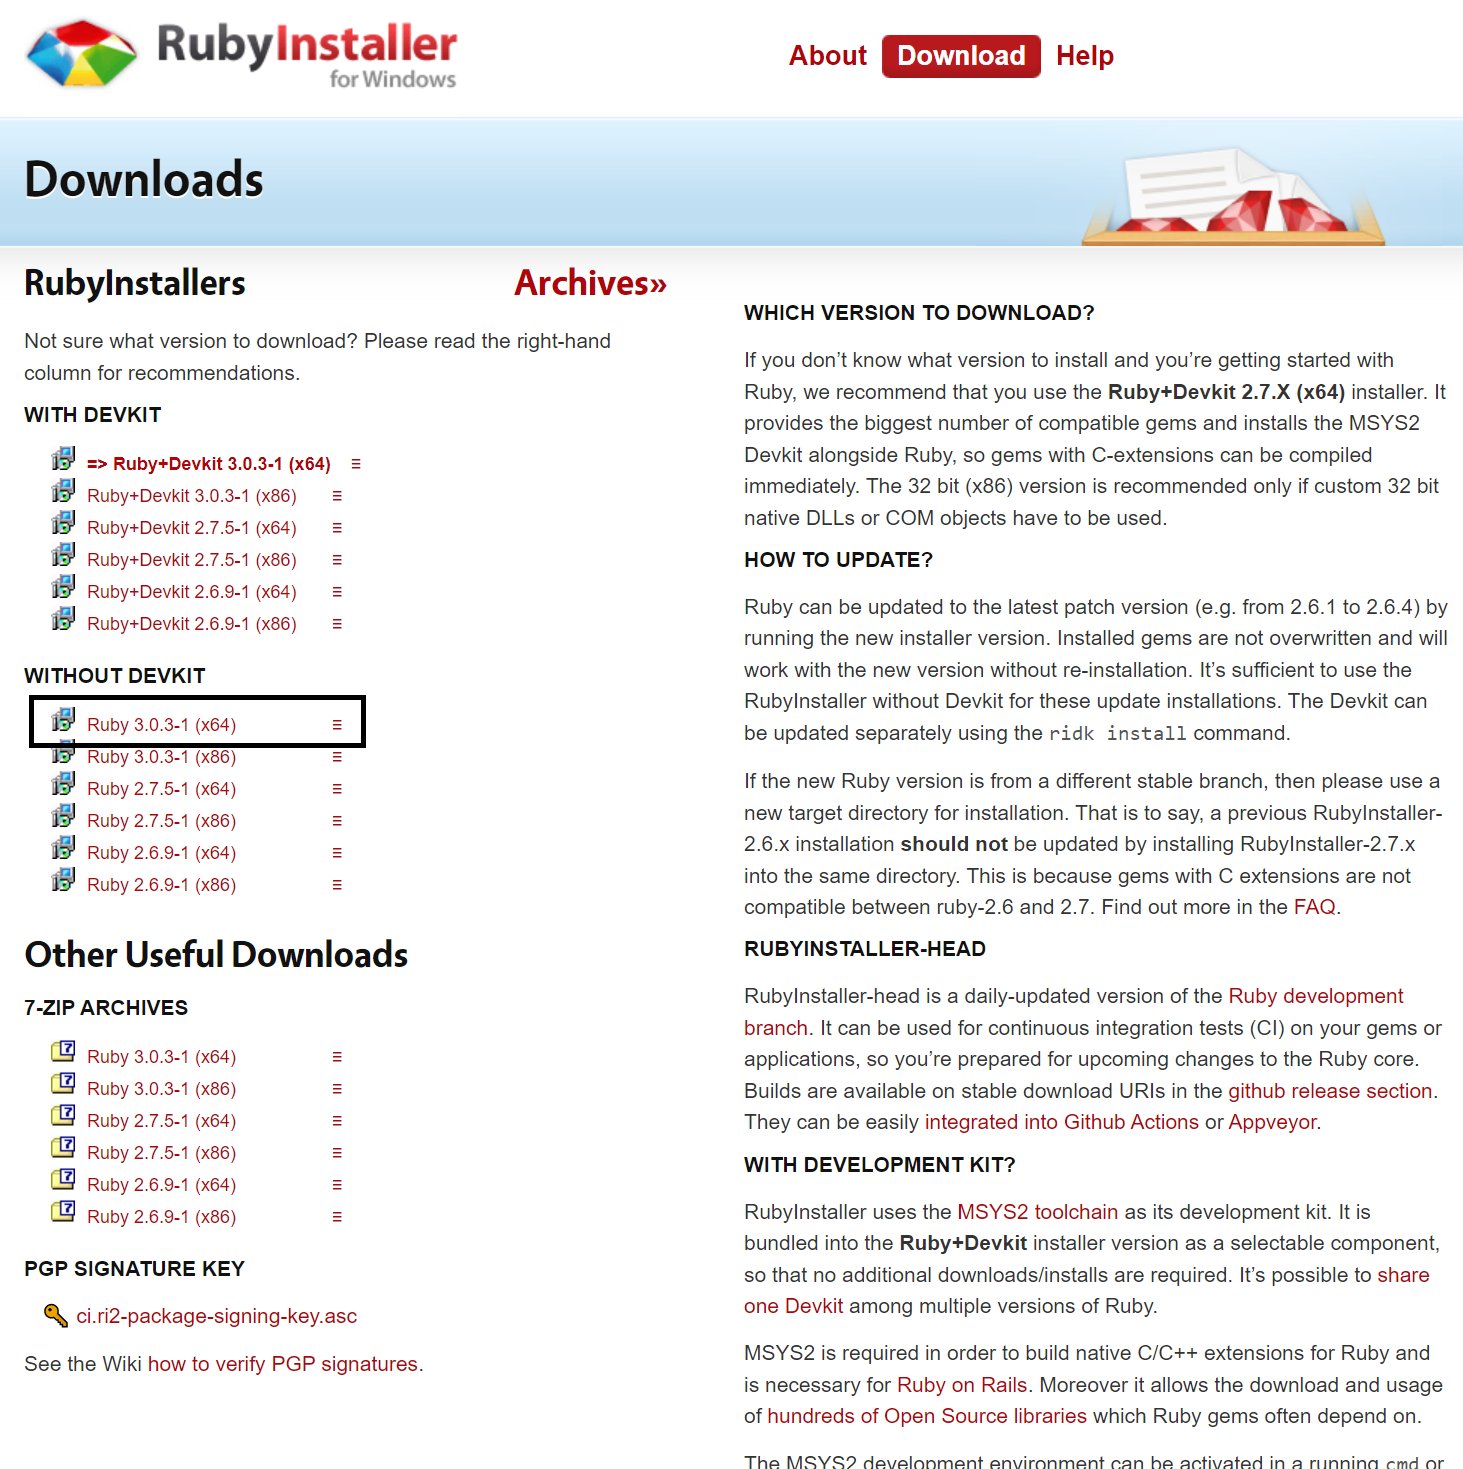
If you wish to use the RubyInstaller installation package, you need to choose the "without Devkit" version: -

ZVqXryg.png

Run the installer and it *should* do everything for you.

You'll still need to install MSYS2, but will not have to add the ruby executable path to your system PATH var.

-

Installing MSYS2

Regardless of how you install Ruby, you need MSYS2 to provide the required build tools.

This is required for all systems: -
  1. Download and install MSYS2
  2. From the "Start" menu in Windows, load the MSYS2 shell
  3. Type "pacman -S mingw-w64-x86_64-ruby" and press enter
  4. After it installs, type "pacman -S mingw-w64-x86_64-toolchain" and press enter
Both of these should give you the ability to run the "ruby" commandline, as well as a number of "build" tools (such as gcc). To test both, from the MSYS2 shell, type "ruby -v" and "gcc -v" to see if they provide any response.

If they do, move to the next step. If they don't you should try closing the MSYS2 shell and opening a new one (to see if that will give you access to the various executables).

-

Environment Variables

Finally, we need to update the PATH variable to make the "ruby" executable accessible from the command line.

How you do this depends on which version of Windows you're using. I'll only write for Windows 10 - if you're using a different version, you can ask me and we can look into it separately: -
  • Click on "Search" (Magnifying glass icon on the taskbar -- if you can't see it, hold the "Windows" key and press "S")
  • Type "Environment"...

    PHbxEm7.png


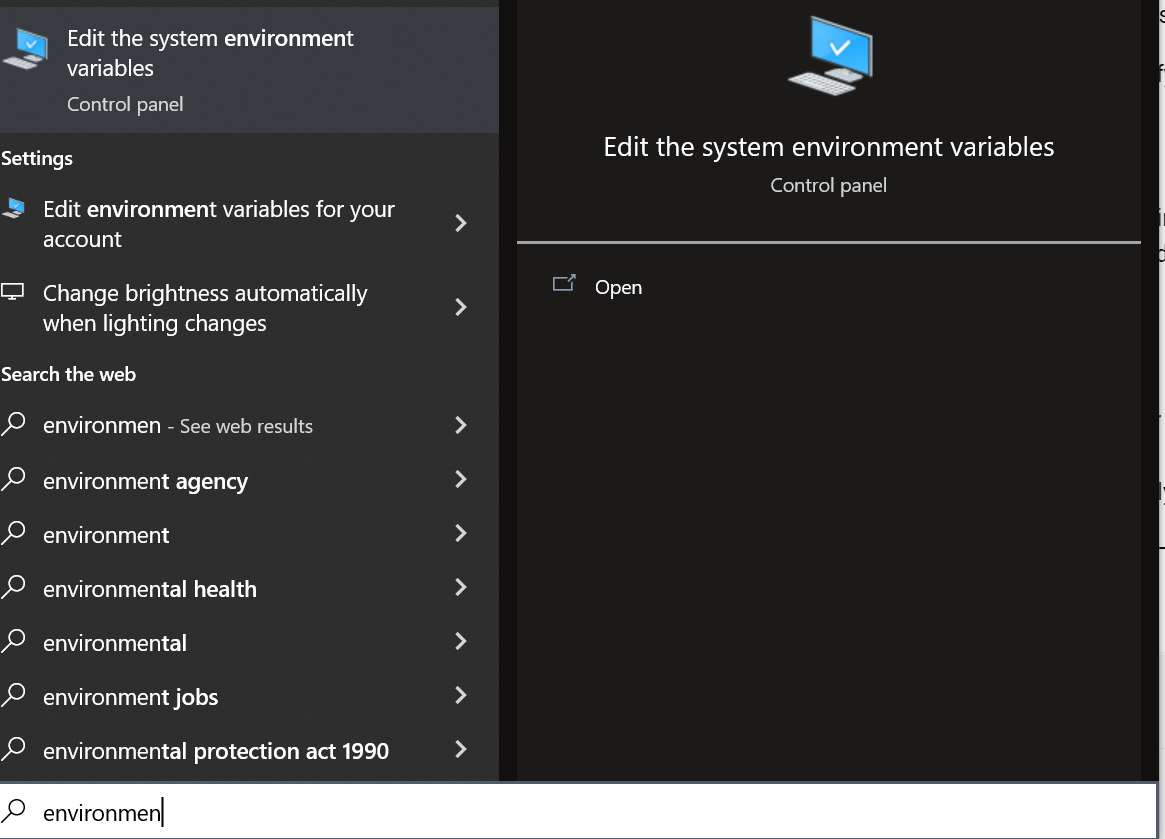
  • "Edit the system and environment variables" should appear
  • Click this and let the Window load...

    uUj3MhS.png


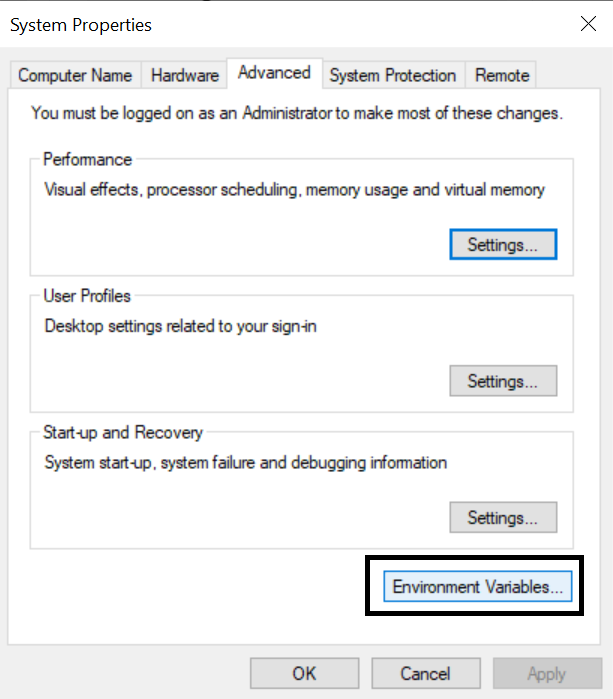
  • Click on "Environment Variables"
  • Look for "Path" (in the SYSTEM part) and select "Edit"...
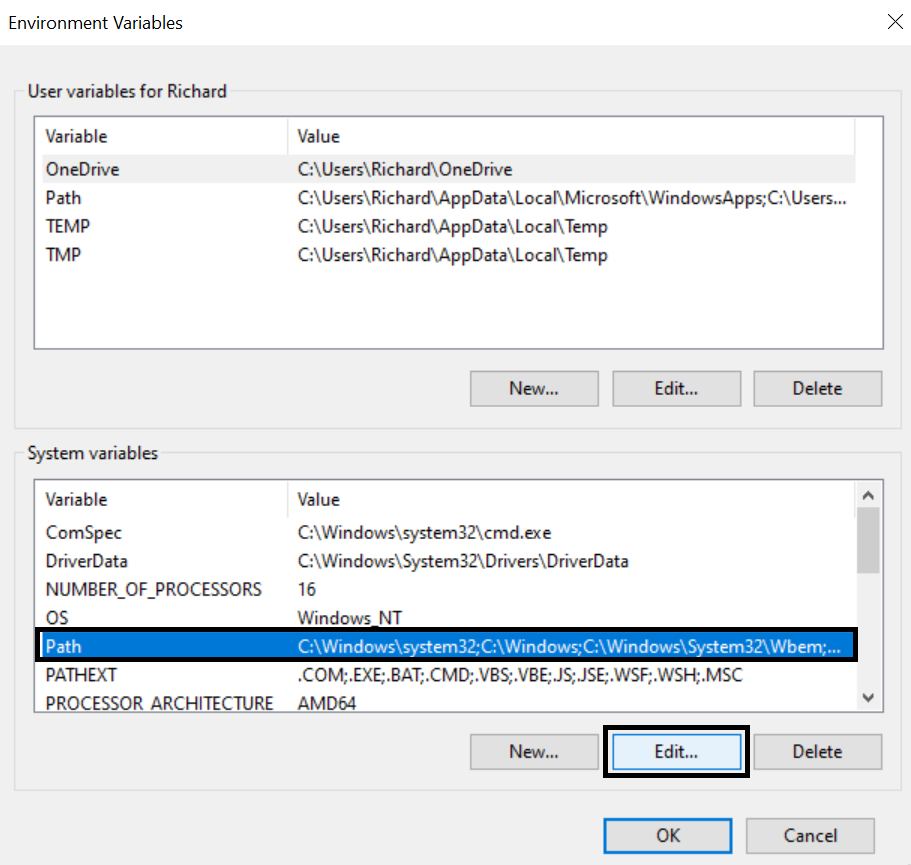
    T9IrAhD.png


  • Select "New": -
    YyW92Mz.png
Which path(s) you add to this will depend on how you installed Ruby.

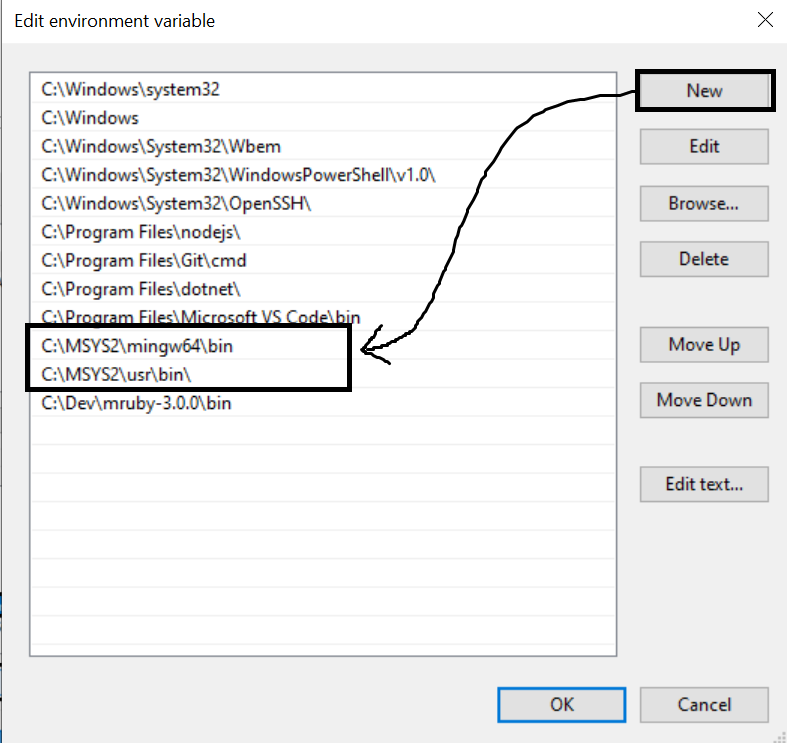
My recommendation is to use the MSYS2 Ruby, as that allows you to keep it all in the same place. If you installed Ruby via RubyInstaller, we will need to add the path to that specific Ruby installation (as well as the MSYS2 install).

This is which paths you should add: -
  • C:/path/to/your/ruby/executable (RubyInstaller only)
  • C:/MSYS2/mingw64/bin (this is required for all)
  • C:/MSYS2/usr/bin (this is required for all)
Adding the MSYS paths allows us to access the various executables it installs from the commandline.

-

Installing RubyGems & Bundler

If you've installed Ruby correctly, you should now be able to access the "ruby" command on the commandline.

iIJ7ncn.png


Now you have ruby, you need to get its package manager (bundler).

Bundler

Bundler helps you install gems from a Gemfile.

Gemfiles are used by Ruby to manage and install dependencies for an application. They work similarly to "package.json" for nodeJS apps.

If you aspire to write any application in Ruby, it's important to have "bundler" installed, as it allows you to process any Gemfile you may need to use for different ruby apps. To do this, we need to install the bundler gem directly to the system, so that it's globally accessible.

Pull up a fresh CMD window and type the following: -
Code:
gem install bundler

This should process without an issue.

If there is a problem, it likely means that "RubyGems" is not installed (RubyGems is to Ruby what NPM is to NodeJS). If you see an error pertaining to RubyGems, it means you need to install it on your system, which I'll explain below.

RubyGems

RubyGems should work out of the box (IE the bundler command above should just work).

If it does not, there is a tutorial here which explains how to get it set up: -
  1. Download the RubyGems files from this URL - Download RubyGems | RubyGems.org | your community gem host
  2. Extract the archive to a local folder (it doesn't matter where because you can delete it afterwards)
  3. Open CMD and cd into that folder
  4. Run the following command: "ruby setup.rb"
This will give you a set of options which should be self explanatory.

After that has run, it means you will be able to interact with the RubyGems packages, of which Ruby2D is one.

Run the "gem install bundler" command again and see if it installs without error. If it does, Ruby should now be fully set up.

-

Installing MRuby

Finally, MRuby.

MRuby is required to "build" the application natively (IE to create a portable EXE you can install on other systems).

It seems that MRuby is a slimmed down version of Ruby which, when integrated with C, provides a link between Ruby code and a native application.

Installing MRuby depends on your system. As this is a Windows tutorial, you have two options: -
Because of the nature of the Ruby2D package I edited, we need to compile a fresh version of MRuby because we need the "mruby-dir" package to traverse folders in the OS. As this is a third party MRuby library, it has to be added at compile time.

If you want to install the MSYS2 version, load up the MSYS2 shell and use the above command. This will install the package and make mruby available at cmd level, which will allow the build toolchain to work. Unfortunately, because the standalone MRuby does not include the "dir" package, it won't work for my version of Ruby2D (I had to hack it to get it to run on Windows).

To compile MRuby (as per my version of the Ruby2D library), you need to do the following: -
  1. Clone the MRuby repository to your local system.

    This can be done by installing GIT (if you don't have it already), loading up CMD, browsing to an appropriate folder and using the following command: -
    Code:
    git clone https://github.com/mruby/mruby

  2. This will copy the MRuby repo code to a directory with the label "mruby" relative to the directory where you ran the command.

    For example, if you ran the command in c:/, you'll get the folder c:/mruby

  3. From here, cd into the mruby folder ("cd mruby")

  4. Open the following file in a text editor: "./mruby/build_config/default.rb"

  5. Add the following to line 16: -
    conf.gem :github => 'iij/mruby-dir'

  6. Save the file and exit the text editor

  7. In CMD, type "rake" and press enter

  8. This will proceed through the mruby build process and SHOULD work. If it does not work, it means you don't have appropriate packages installed inside Windows. This will be specific to your machine, so I cannot provide any insight onto what may be missing here.

    If you get an error, let me know and we'll see if we can get it to work.
Once it's compiled, you then need to put the mruby folder into a permanent location on your hard drive and add its "bin" directory to your system's path.

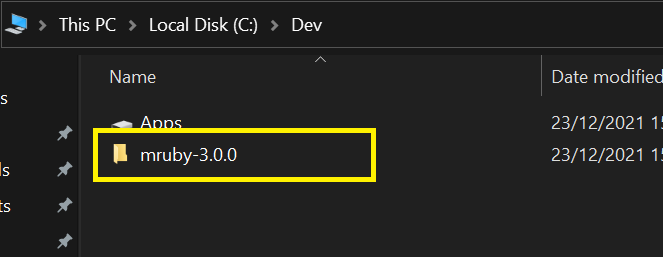
I keep my development tools in c:/dev, so I put my mruby in that directory: -

4ziL2Md.png


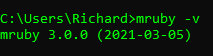
This is ONLY if you compiled locally -- from here, you should be able to add the c:/dev/mruby/bin directory to your system PATH variable (instructions above). This will make the "mruby" command available in cmd: -

ACyLZhK.png


--

Installing Simple2D, Glew & Other Libraries For Ruby2D

Finally, you need to obtain the libraries required to get Ruby2D to compile.

These include Simple2D and Glew.

We can install these via MSYS2 (one of the immense benefits of having it installed):-
  1. Load up the MSYS2 shell (or just normal CMD if you're able to run "pacman" from it)
  2. Type the following commands (press enter after inputting each): -
    1. pacman -S mingw-w64-x86_64-glew
    2. pacman -S mingw-w64-x86_64-SDL2_mixer
    3. pacman -S mingw-w64-x86_64-SDL2_image
    4. pacman -S mingw-w64-x86_64-SDL2_ttf
    5. pacman -S mingw-w64-x86_64-SDL2
These should install without issue.

There may be more libraries we need but I don't know them off the top of my head - we can look for them if errors arise later.

The key point is that having MSYS2 installed means we have a means to access libraries that don't need to be compiled. It's extremely important to have this as it fixes one of the biggest issues facing Windows developers.

To be clear, these are ONLY for the "build" part of Ruby2D. If you just want to create a "ruby" app, you don't need the above.

--

Conclusion

IF
all of this works, it means you now have your local development environment set up to support building a native version of your Ruby2D app.

I will write another article explaining what I did to change the Ruby2D code to get it to build on Windows below.

This is not an ad. I don't care if you use the information or not - I write this sort of thing to give me perspective on what was done for future purposes. I figured that, as I'd seen some people wanting to make games to sell, R2D could make that ideal more accessible (and cheaper).

After the next article, I may see if I can bring myself to attempt to make a Doom clone with it (or something challenging). I'm not an expert in C, so may be biting off more than I can chew. I do have some time to do it and would be happy to help anyone who wants to start using Ruby, or programming generally, so long as it's evident you're actually trying to do something proactive.
 
Dislike ads? Remove them and support the forum: Subscribe to Fastlane Insiders.

rpeck90

Gold Contributor
Speedway Pass
User Power
Value/Post Ratio
442%
Nov 26, 2016
317
1,401
34
United Kingdom
In order to get Ruby2D working in terms of the build pipeline, I had to change some things.

The public gem "works" right now for pure Ruby development, which means you can use it to develop locally (just run "ruby x.rb" in the cmd to get it working).

However, if you wanted to compile the app into a native executable, I had to make changes.

The basis of this thread is to keep a record of what was done so that I can refer back to it. In doing so, I figured that the library may help someone else (as mentioned in the previous post). It probably won't help many, but that's not really the point.

--

Compilation

I attempted to "build" a script I created to test out the capabilities of the system (the one I showed in the GIF at the start of the thread).

Unfortunately, there were a number of errors. I explained what was done to overcome them here but for the sake of posterity, I will outline everything in this article. No, it's not going to make you millions, but it may show some insight into a real life problem solving process.

I'm extremely proud of having fixed it.

-

The Ruby2D native build process is listed as follows: -

MTcJFEC.png


If you run the above command ("ruby2d build x.rb"), the library will invoke your local compiler and compile your script into a native executable.

Upon doing that, this error appeared: -
╰─ $ ruby2d build --native *.rb
build/app.c: In function ‘ruby2d_image_ext_load_image’:
build/app.c:3308:3: error: unknown type name ‘VALUE’
3308 | VALUE result = rb_ary_new2(3);
| ^~~~~
build/app.c:3308:18: warning: implicit declaration of function ‘rb_ary_new2’; did you mean ‘mrb_ary_new’? [-Wimplicit-function-declaration]
3308 | VALUE result = rb_ary_new2(3);
| ^~~~~~~~~~~
| mrb_ary_new
build/app.c:3313:3: warning: implicit declaration of function ‘rb_ary_push’; did you mean ‘mrb_ary_push’? [-Wimplicit-function-declaration]
3313 | rb_ary_push(result, r_data_wrap_struct(surface, surface));
| ^~~~~~~~~~~
| mrb_ary_push
In file included from build/app.c:2960:
build/app.c:3313:42: error: ‘surface_data_type’ undeclared (first use in this function); did you mean ‘music_data_type’?
3313 | rb_ary_push(result, r_data_wrap_struct(surface, surface));
| ^~~~~~~
build/app.c:3313:23: note: in expansion of macro ‘r_data_wrap_struct’
3313 | rb_ary_push(result, r_data_wrap_struct(surface, surface));
| ^~~~~~~~~~~~~~~~~~
build/app.c:3313:42: note: each undeclared identifier is reported only once for each function it appears in
3313 | rb_ary_push(result, r_data_wrap_struct(surface, surface));
| ^~~~~~~
build/app.c:3313:23: note: in expansion of macro ‘r_data_wrap_struct’
3313 | rb_ary_push(result, r_data_wrap_struct(surface, surface));
| ^~~~~~~~~~~~~~~~~~
build/app.c:3317:10: error: incompatible types when returning type ‘int’ but ‘mrb_value’ was expected
3317 | return result;
| ^~~~~~
build/app.c: In function ‘ruby2d_text_ext_load_text’:
build/app.c:3327:3: error: unknown type name ‘VALUE’
3327 | VALUE result = rb_ary_new2(3);
| ^~~~~

As I have a low amount of experience with C/C++ (which is what the above errors are for), I had to do some digging into what the issue could be.

Firstly, I tried the standard process of fixing the potential superficial problems that would lead the likes of the above to show (equivalent of turning it off and back on again) - changed Ruby version, re-installed MRuby etc. No change - which meant that it was likely a coding issue.

At this point, I had the fight or flight situation - either you summon the willpower to figure out the problem or just leave it and say it doesn't work.

Because I had time, and wanted to gain C experience, decided on the former.

To do this, I first tried to figure out where the errors were being raised. "build/app.c" was not present on my system, so I figured that it was either temporarily created (by the compiler) or there was something else going on. In any case, I had to find out which code was being called to identify what the potential problem might be.

After some digging, I located build.rb: -
# Build a native version of the provided Ruby application
def build_native(rb_file)
check_build_src_file(rb_file)

# Check if MRuby exists; if not, quit
if `which mruby`.empty?
puts "#{'Error:'.error} Can't find MRuby, which is needed to build native Ruby 2D applications.\n"
exit
end

# Add debugging information to produce backtrace
if @debug then debug_flag = '-g' end

# Assemble the Ruby 2D library in one `.rb` file and compile to bytecode
make_lib
`mrbc #{debug_flag} -Bruby2d_lib -obuild/lib.c build/lib.rb`

# Read the provided Ruby source file, copy to build dir and compile to bytecode
File.open('build/src.rb', 'w') { |file| file << strip_require(rb_file) }
`mrbc #{debug_flag} -Bruby2d_app -obuild/src.c build/src.rb`

# Combine contents of C source files and bytecode into one file
open('build/app.c', 'w') do |f|
f << "#define MRUBY 1" << "\n\n"
f << File.read("build/lib.c") << "\n\n"
f << File.read("build/src.c") << "\n\n"
f << File.read("#{@gem_dir}/ext/ruby2d/ruby2d.c")
end

# Compile to a native executable
`cc build/app.c -lmruby -o build/app`

# Clean up
clean_up unless @debug

# Success!
puts "Native app created at `build/app`"
end

This function/method seemed to be the one responsible for the compiler command and so I began investigating.

The main thing I realized was as follows: -
  • The way this function worked was to compress the "source" file (the one the user has written), a "lib" file and the "ruby2d.c" file into a single C file called "app.c". This file is added to the "build" folder (local to your compilation command) and removed afterwards.

  • The script would then call gcc (or whichever compiler you have installed) to build that file, linking mruby.
-

This said, to me, that the errors inside build/app.c where actually errors inside "#{@gem_dir}/ext/ruby2d/ruby2d.c", meaning I had to find that file and identify the various lines that were causing the compiler to stop.

Fortunately, I was able to do this by identifying the file here.

I started looking for the errors highlighted above: -
C:
build/app.c: In function ‘ruby2d_image_ext_load_image’:
build/app.c:3308:3: error: unknown type name ‘VALUE’
 3308 |   VALUE result = rb_ary_new2(3);
      |   ^~~~~
C:
warning: implicit declaration of function ‘rb_ary_new2’; did you mean ‘mrb_ary_new’? [-Wimplicit-function-declaration]
 3308 |   VALUE result = rb_ary_new2(3);
      |                  ^~~~~~~~~~~
A cursory search for the function mentioned above brought back the following: -
C:
/*
 * Ruby2D::Image#ext_load_image
 * Create an SDL surface from an image path, return the surface, width, and height
 */
static R_VAL ruby2d_image_ext_load_image(R_VAL self, R_VAL path) {
  R2D_Init();

  VALUE result = rb_ary_new2(3);

  SDL_Surface *surface = R2D_CreateImageSurface(RSTRING_PTR(path));
  R2D_ImageConvertToRGB(surface);

  rb_ary_push(result, r_data_wrap_struct(surface, surface));
  rb_ary_push(result, INT2NUM(surface->w));
  rb_ary_push(result, INT2NUM(surface->h));

  return result;
}
As I didn't really know what all of this meant, I could only take it at face value. I presumed the code was correct.

After a lot of searching (for the "value" error), I decided to look at the other one --> "‘rb_ary_new2’; did you mean ‘mrb_ary_new’"

I looked up "rb_ary_new2" online and found this page.

It seemed the syntax was correct (including the "VALUE" statement), so I began thinking about why the compiler would not recognize the function. Then it hit me -- the reason why "function not found" errors appear is because the compiler/interpreter is unable to load the library which defines it. This means that either the function definition is wrong or the library is not loaded.

At this point, I realized that the function above is written for RUBY.

Upon checking other functions, it seemed they had options for MRUBY, meaning that the error was likely caused because it was using ruby commands, rather than the mruby equivalent.

When I realized this, I began seeing MRUBY code all over the file: -
C:
/*
 * Ruby2D::Sound#ext_get_volume
 */
#if MRUBY
static R_VAL ruby2d_sound_ext_get_volume(mrb_state* mrb, R_VAL self) {
#else
static R_VAL ruby2d_sound_ext_get_volume(R_VAL self) {
#endif
  R2D_Sound *snd;
  r_data_get_struct(self, "@data", &sound_data_type, R2D_Sound, snd);
  return INT2NUM(ceil(Mix_VolumeChunk(snd->data, -1) * (100.0 / MIX_MAX_VOLUME)));
}
This was crucial, as it told me the "rb_ary_new2" errors were caused, primarily, by there being no MRUBY equivalent.

It meant I'd have to rewrite the functions using MRuby code :)

This is what I ended up with: -
C:
/*
 * Ruby2D::Image#ext_load_image
 * Create an SDL surface from an image path, return the surface, width, and height
 */
#if MRUBY
  static R_VAL ruby2d_image_ext_load_image(mrb_state* mrb, R_VAL self) {
    R2D_Init();
    mrb_value result = mrb_ary_new(mrb);
    mrb_value path;
    mrb_get_args(mrb, "s", &path);
    SDL_Surface *surface = R2D_CreateImageSurface(RSTRING_PTR(path));
    R2D_ImageConvertToRGB(surface);
    mrb_ary_push(mrb, result, r_data_wrap_struct(surface, surface));
    mrb_ary_push(mrb, result, INT2NUM(surface->w));
    mrb_ary_push(mrb, result, INT2NUM(surface->h));
    return result;
  }
#else
  static R_VAL ruby2d_image_ext_load_image(R_VAL self, R_VAL path) {
    R2D_Init();
    VALUE result = rb_ary_new2(3);
    SDL_Surface *surface = R2D_CreateImageSurface(RSTRING_PTR(path));
    R2D_ImageConvertToRGB(surface);
    rb_ary_push(result, r_data_wrap_struct(surface, surface));
    rb_ary_push(result, INT2NUM(surface->w));
    rb_ary_push(result, INT2NUM(surface->h));
    return result;
  }
#endif

After looking at some other functions, and using some common sense, I figured that I'd have to replace the "rb_" functions with "mrb_".

I won't go into details about how I managed to get the right syntax, it was a lot of trial and error.

Upon implementing this to the various functions mentioned in the compiler error, it fixed them all... leading new errors to appear!!

-

Linker Errors

The above were syntax/code errors.

The next load were from the compiler itself: -
C:
build/app.c:2260:12: fatal error: mruby.h: No such file or directory
   #include <mruby.h>
            ^~~~~~~~~
compilation terminated.
This was the first problem.

Fortunately, someone else managed to fix it - which pointed me to including the "mruby.h" directory in the build command.

The same guy also had a number of other errors which I also experienced. The solution to them all was to include the "mruby" and "mingw64" paths directly in the build command: -
C:
 `cc build/icon.o build/app.c -I#{@gem_dir}/ext/ruby2d -I#{@gem_dir}/assets/include -LC:/Dev/mruby-3.0.0/build/host/lib -IC:/MSYS2/mingw64/include/ruby-3.0.0 -IC:/MSYS2/mingw64/include/ruby-3.0.0/x64-mingw32 -IC:/Dev/mruby-3.0.0/include -lmruby -lws2_32 -lSDL2 -lSDL2_image -lSDL2_mixer -lSDL2_ttf -lopengl32 -lglew32 -o build/app`

I won't explain specifics - I'll just say that I had to include the /assets/mingw folder in the gem as well as the various include directories for MSYS2, MRuby etc. I also linked a number of libraries, in part due to the recommendations provided here.

With the above (you'll see the likes of SDL2 and SDL2_mixer as the libraries installed at the start) in place, I came to a final set of compiler errors: -
C:
C:/MSYS2/mingw64/bin/../lib/gcc/x86_64-w64-mingw32/11.2.0/../../../../x86_64-w64-mingw32/bin/ld.exe: C:\Users\Richard\AppData\Local\Temp\ccjCc50o.o:app.c:(.text+0x205): undefined reference to `R2D_FreeWindow'
C:/MSYS2/mingw64/bin/../lib/gcc/x86_64-w64-mingw32/11.2.0/../../../../x86_64-w64-mingw32/bin/ld.exe: C:\Users\Richard\AppData\Local\Temp\ccjCc50o.o:app.c:(.text+0x867): undefined reference to `R2D_DrawQuad'
C:/MSYS2/mingw64/bin/../lib/gcc/x86_64-w64-mingw32/11.2.0/../../../../x86_64-w64-mingw32/bin/ld.exe: C:\Users\Richard\AppData\Local\Temp\ccjCc50o.o:app.c:(.text+0xcc1): undefined reference to `R2D_DrawTriangle'
C:/MSYS2/mingw64/bin/../lib/gcc/x86_64-w64-mingw32/11.2.0/../../../../x86_64-w64-mingw32/bin/ld.exe: C:\Users\Richard\AppData\Local\Temp\ccjCc50o.o:app.c:(.text+0x12dd): undefined reference to `R2D_DrawQuad'
C:/MSYS2/mingw64/bin/../lib/gcc/x86_64-w64-mingw32/11.2.0/../../../../x86_64-w64-mingw32/bin/ld.exe: C:\Users\Richard\AppData\Local\Temp\ccjCc50o.o:app.c:(.text+0x17fb): undefined reference to `R2D_DrawLine'
C:/MSYS2/mingw64/bin/../lib/gcc/x86_64-w64-mingw32/11.2.0/../../../../x86_64-w64-mingw32/bin/ld.exe: C:\Users\Richard\AppData\Local\Temp\ccjCc50o.o:app.c:(.text+0x1a0a): undefined reference to `R2D_DrawCircle'
C:/MSYS2/mingw64/bin/../lib/gcc/x86_64-w64-mingw32/11.2.0/../../../../x86_64-w64-mingw32/bin/ld.exe: C:\Users\Richard\AppData\Local\Temp\ccjCc50o.o:app.c:(.text+0x1a4a): undefined reference to `R2D_Init'
C:/MSYS2/mingw64/bin/../lib/gcc/x86_64-w64-mingw32/11.2.0/../../../../x86_64-w64-mingw32/bin/ld.exe: C:\Users\Richard\AppData\Local\Temp\ccjCc50o.o:app.c:(.text+0x1a9a): undefined reference to `R2D_CreateImageSurface'
C:/MSYS2/mingw64/bin/../lib/gcc/x86_64-w64-mingw32/11.2.0/../../../../x86_64-w64-mingw32/bin/ld.exe: C:\Users\Richard\AppData\Local\Temp\ccjCc50o.o:app.c:(.text+0x1aaa): undefined reference to `R2D_ImageConvertToRGB'
C:/MSYS2/mingw64/bin/../lib/gcc/x86_64-w64-mingw32/11.2.0/../../../../x86_64-w64-mingw32/bin/ld.exe: C:\Users\Richard\AppData\Local\Temp\ccjCc50o.o:app.c:(.text+0x1b5e): undefined reference to `R2D_Init'
C:/MSYS2/mingw64/bin/../lib/gcc/x86_64-w64-mingw32/11.2.0/../../../../x86_64-w64-mingw32/bin/ld.exe: C:\Users\Richard\AppData\Local\Temp\ccjCc50o.o:app.c:(.text+0x1bfa): undefined reference to `R2D_TextCreateSurface'
C:/MSYS2/mingw64/bin/../lib/gcc/x86_64-w64-mingw32/11.2.0/../../../../x86_64-w64-mingw32/bin/ld.exe: C:\Users\Richard\AppData\Local\Temp\ccjCc50o.o:app.c:(.text+0x1e00): undefined reference to `R2D_GL_CreateTexture'
C:/MSYS2/mingw64/bin/../lib/gcc/x86_64-w64-mingw32/11.2.0/../../../../x86_64-w64-mingw32/bin/ld.exe: C:\Users\Richard\AppData\Local\Temp\ccjCc50o.o:app.c:(.text+0x1e86): undefined reference to `R2D_GL_FreeTexture'
C:/MSYS2/mingw64/bin/../lib/gcc/x86_64-w64-mingw32/11.2.0/../../../../x86_64-w64-mingw32/bin/ld.exe: C:\Users\Richard\AppData\Local\Temp\ccjCc50o.o:app.c:(.text+0x1f01): undefined reference to `R2D_CreateSound'
C:/MSYS2/mingw64/bin/../lib/gcc/x86_64-w64-mingw32/11.2.0/../../../../x86_64-w64-mingw32/bin/ld.exe: C:\Users\Richard\AppData\Local\Temp\ccjCc50o.o:app.c:(.text+0x1fe4): undefined reference to `R2D_PlaySound'
C:/MSYS2/mingw64/bin/../lib/gcc/x86_64-w64-mingw32/11.2.0/../../../../x86_64-w64-mingw32/bin/ld.exe: C:\Users\Richard\AppData\Local\Temp\ccjCc50o.o:app.c:(.text+0x205f): undefined reference to `R2D_GetSoundLength'
C:/MSYS2/mingw64/bin/../lib/gcc/x86_64-w64-mingw32/11.2.0/../../../../x86_64-w64-mingw32/bin/ld.exe: C:\Users\Richard\AppData\Local\Temp\ccjCc50o.o:app.c:(.text+0x2094): undefined reference to `R2D_FreeSound'
C:/MSYS2/mingw64/bin/../lib/gcc/x86_64-w64-mingw32/11.2.0/../../../../x86_64-w64-mingw32/bin/ld.exe: C:\Users\Richard\AppData\Local\Temp\ccjCc50o.o:app.c:(.text+0x23db): undefined reference to `R2D_CreateMusic'
C:/MSYS2/mingw64/bin/../lib/gcc/x86_64-w64-mingw32/11.2.0/../../../../x86_64-w64-mingw32/bin/ld.exe: C:\Users\Richard\AppData\Local\Temp\ccjCc50o.o:app.c:(.text+0x24f9): undefined reference to `R2D_PlayMusic'
C:/MSYS2/mingw64/bin/../lib/gcc/x86_64-w64-mingw32/11.2.0/../../../../x86_64-w64-mingw32/bin/ld.exe: C:\Users\Richard\AppData\Local\Temp\ccjCc50o.o:app.c:(.text+0x251a): undefined reference to `R2D_PauseMusic'
C:/MSYS2/mingw64/bin/../lib/gcc/x86_64-w64-mingw32/11.2.0/../../../../x86_64-w64-mingw32/bin/ld.exe: C:\Users\Richard\AppData\Local\Temp\ccjCc50o.o:app.c:(.text+0x253a): undefined reference to `R2D_ResumeMusic'
C:/MSYS2/mingw64/bin/../lib/gcc/x86_64-w64-mingw32/11.2.0/../../../../x86_64-w64-mingw32/bin/ld.exe: C:\Users\Richard\AppData\Local\Temp\ccjCc50o.o:app.c:(.text+0x255a): undefined reference to `R2D_StopMusic'
C:/MSYS2/mingw64/bin/../lib/gcc/x86_64-w64-mingw32/11.2.0/../../../../x86_64-w64-mingw32/bin/ld.exe: C:\Users\Richard\AppData\Local\Temp\ccjCc50o.o:app.c:(.text+0x257a): undefined reference to `R2D_GetMusicVolume'
C:/MSYS2/mingw64/bin/../lib/gcc/x86_64-w64-mingw32/11.2.0/../../../../x86_64-w64-mingw32/bin/ld.exe: C:\Users\Richard\AppData\Local\Temp\ccjCc50o.o:app.c:(.text+0x260a): undefined reference to `R2D_SetMusicVolume'
C:/MSYS2/mingw64/bin/../lib/gcc/x86_64-w64-mingw32/11.2.0/../../../../x86_64-w64-mingw32/bin/ld.exe: C:\Users\Richard\AppData\Local\Temp\ccjCc50o.o:app.c:(.text+0x2695): undefined reference to `R2D_FadeOutMusic'
C:/MSYS2/mingw64/bin/../lib/gcc/x86_64-w64-mingw32/11.2.0/../../../../x86_64-w64-mingw32/bin/ld.exe: C:\Users\Richard\AppData\Local\Temp\ccjCc50o.o:app.c:(.text+0x270f): undefined reference to `R2D_GetMusicLength'
C:/MSYS2/mingw64/bin/../lib/gcc/x86_64-w64-mingw32/11.2.0/../../../../x86_64-w64-mingw32/bin/ld.exe: C:\Users\Richard\AppData\Local\Temp\ccjCc50o.o:app.c:(.text+0x2741): undefined reference to `R2D_Init'
C:/MSYS2/mingw64/bin/../lib/gcc/x86_64-w64-mingw32/11.2.0/../../../../x86_64-w64-mingw32/bin/ld.exe: C:\Users\Richard\AppData\Local\Temp\ccjCc50o.o:app.c:(.text+0x281a): undefined reference to `R2D_FontCreateTTFFont'
C:/MSYS2/mingw64/bin/../lib/gcc/x86_64-w64-mingw32/11.2.0/../../../../x86_64-w64-mingw32/bin/ld.exe: C:\Users\Richard\AppData\Local\Temp\ccjCc50o.o:app.c:(.text+0x29c0): undefined reference to `R2D_GL_DrawTexture'
C:/MSYS2/mingw64/bin/../lib/gcc/x86_64-w64-mingw32/11.2.0/../../../../x86_64-w64-mingw32/bin/ld.exe: C:\Users\Richard\AppData\Local\Temp\ccjCc50o.o:app.c:(.text+0x2a1a): undefined reference to `R2D_FreeMusic'
C:/MSYS2/mingw64/bin/../lib/gcc/x86_64-w64-mingw32/11.2.0/../../../../x86_64-w64-mingw32/bin/ld.exe: C:\Users\Richard\AppData\Local\Temp\ccjCc50o.o:app.c:(.text+0x37df): undefined reference to `R2D_Diagnostics'
C:/MSYS2/mingw64/bin/../lib/gcc/x86_64-w64-mingw32/11.2.0/../../../../x86_64-w64-mingw32/bin/ld.exe: C:\Users\Richard\AppData\Local\Temp\ccjCc50o.o:app.c:(.text+0x380d): undefined reference to `R2D_GetDisplayDimensions'
C:/MSYS2/mingw64/bin/../lib/gcc/x86_64-w64-mingw32/11.2.0/../../../../x86_64-w64-mingw32/bin/ld.exe: C:\Users\Richard\AppData\Local\Temp\ccjCc50o.o:app.c:(.text+0x3917): undefined reference to `R2D_Log'
C:/MSYS2/mingw64/bin/../lib/gcc/x86_64-w64-mingw32/11.2.0/../../../../x86_64-w64-mingw32/bin/ld.exe: C:\Users\Richard\AppData\Local\Temp\ccjCc50o.o:app.c:(.text+0x395a): undefined reference to `R2D_AddControllerMappingsFromFile'
C:/MSYS2/mingw64/bin/../lib/gcc/x86_64-w64-mingw32/11.2.0/../../../../x86_64-w64-mingw32/bin/ld.exe: C:\Users\Richard\AppData\Local\Temp\ccjCc50o.o:app.c:(.text+0x3fa2): undefined reference to `R2D_CreateWindow'
C:/MSYS2/mingw64/bin/../lib/gcc/x86_64-w64-mingw32/11.2.0/../../../../x86_64-w64-mingw32/bin/ld.exe: C:\Users\Richard\AppData\Local\Temp\ccjCc50o.o:app.c:(.text+0x4033): undefined reference to `R2D_Show'
C:/MSYS2/mingw64/bin/../lib/gcc/x86_64-w64-mingw32/11.2.0/../../../../x86_64-w64-mingw32/bin/ld.exe: C:\Users\Richard\AppData\Local\Temp\ccjCc50o.o:app.c:(.text+0x40cd): undefined reference to `R2D_Screenshot'
C:/MSYS2/mingw64/bin/../lib/gcc/x86_64-w64-mingw32/11.2.0/../../../../x86_64-w64-mingw32/bin/ld.exe: C:\Users\Richard\AppData\Local\Temp\ccjCc50o.o:app.c:(.text+0x40f5): undefined reference to `R2D_Close'
collect2.exe: error: ld returned 1 exit status
Native app created at `build/app`

These new errors were suggesting that the likes of "R2D_Close" was not defined.

This created a huge amount of difficulty for me.

Apart from my inexperience with C, I was unsure as to how these should be managed - for example, I was well aware that R2D_Close was defined inside ruby2d.h: -
C:
/*
 * Close the window
 */
int R2D_Close(R2D_Window *window);

All of the research I conducted online pointed to this being appropriate.

This made me think that "ruby2d.h" was not being called by the compiler or something. I tried a lot of things, including calling it directly.

The errors persisted... so I left it for a couple of days.

When I came back to it, I had a revelation.

I realized the declarations inside ruby2d.h didn't actually point anywhere. They just stated the existence of the variable, but didn't actually provide any functionality to handle it. This intrigued me, and so I decided to see if I could identify where it was declared.

From here, I managed to locate the various ".c" files inside the ext/ruby2d folder: -

doe2Brx.png


In looking at window.c, I discovered what I had been looking for: -
C:
/*
 * Close the window
 */
int R2D_Close(R2D_Window *window) {
  if (!window->close) {
    R2D_Log(R2D_INFO, "Closing window");
    window->close = true;
  }
  return 0;
}
This was what the compiler was complaining about.

Thus, I decided to include the various .c files I had found in the build command: -
C:
  `cc build/icon.o build/app.c #{@gem_dir}/ext/ruby2d/common.c #{@gem_dir}/ext/ruby2d/controllers.c #{@gem_dir}/ext/ruby2d/gl.c #{@gem_dir}/ext/ruby2d/gl2.c #{@gem_dir}/ext/ruby2d/gl3.c #{@gem_dir}/ext/ruby2d/gles.c #{@gem_dir}/ext/ruby2d/font.c #{@gem_dir}/ext/ruby2d/image.c #{@gem_dir}/ext/ruby2d/input.c #{@gem_dir}/ext/ruby2d/music.c #{@gem_dir}/ext/ruby2d/shapes.c #{@gem_dir}/ext/ruby2d/sound.c #{@gem_dir}/ext/ruby2d/text.c #{@gem_dir}/ext/ruby2d/window.c -I#{@gem_dir}/ext/ruby2d -I#{@gem_dir}/assets/include -LC:/Dev/mruby-3.0.0/build/host/lib -IC:/MSYS2/mingw64/include/ruby-3.0.0 -IC:/MSYS2/mingw64/include/ruby-3.0.0/x64-mingw32 -IC:/Dev/mruby-3.0.0/include -lmruby -lws2_32 -lSDL2 -lSDL2_image -lSDL2_mixer -lSDL2_ttf -lopengl32 -lglew32 -o build/app`

When I used that build command, all of the errors disappeared and the app compiled!!!!


Unfortunately, the app itself would not load, so I had to then consider how to fix that.

-

App Errors

The app itself would not load.

It would basically flicker and then close instantly. No error messages etc.

One of the most important aspects of computers/technology is having a valid log/output of what's going on - without this, you have no way to identify the core problem. My dad always used to tell me that problem solving is 90% identifying the problem.

In this case, there were two potential causes: -

1. The OS was not able to run the compiled app
2. The app had problems with the code

To see if I could find the problem (remember, I changed some of the library/C code), I started playing around with the code I was using -- I removed everything from my file so that only the absolute bare bones would be compiled.

Funnily enough, this worked - a black screen appeared (and stayed).

This told me that the OS was fine running the app. The problem seemed to be at the code level.

The question was which code?

-

I had a breakthrough...

ibc8VsH.png


Each time I loaded the compiled app, a console would also appear.

You could actually output to this console using ruby's "puts" command.

Because I figured the console was a symptom of MRuby, I wondered if it would load if I loaded the app from an already-existent console. IE if I loaded cmd, "cd" into the "build" directory for the app and invoked the app manually?

I tried this and discovered that - to my surprise - the ERROR the application failed with would output to the CMD. This gave me a specific insight into where to begin looking for the problem.

As I knew the error was not OS-dependent (IE was a code/syntax error), I started looking into what may be causing it.

I'll explain what I did to fix the underlying code in another article I'll just do it here as there were two things I had to fix.

-

Rand Range

The first error I received was this: -
Ruby:
can't convert range in to integer
I struggled to figure out what the error was, until I realized that I had included the following in my code: -
Ruby:
       @shape = Circle.new(
            x: rand(Window.width),
            y: rand(Window.height),
            radius: rand(0..0.5),
            color: 'random',
            z: -2,
            opacity: rand(0.1..0.8)
        )

When I removed this code, the app worked, which meant that something inside it was not working.

I later realized that the "rand(x..y)" function was the issue.

Now, this is standard Ruby code and entirely within the scope of the Ruby syntax - the problem was that I wasn't using "ruby" but MRuby.

I presumed MRuby had all the same functionality as Ruby, put evidently I was wrong. Thus, I created a simple workaround with the help of this StackOverflow answer.

After implementing this, I could add any shape to the window.


-

Font Texture Issue

By far the more pressing issue was that of the font textures.

To give context, adding shapes was fine, but adding fonts threw more errors. It took some time to figure out the problem - it was basically due to two things: -

1. Windows not having the "uname" command
2. Some of my C code not working properly

The first issue was that the "font" class inside Ruby2D originally had a means to differentiate between operating systems by invoking the "uname" command in the OS: -
Ruby:
          uname = `uname`
          if uname.include? 'Darwin'  # macOS
            macos_font_path
          elsif uname.include? 'Linux'
            linux_font_path
          elsif uname.include? 'MINGW'
            windows_font_path
          elsif uname.include? 'OpenBSD'
            openbsd_font_path
          end
As this command is not native to Windows (you can get the exe which supports it, but that's a separate third party thing), the above fails to provide any path to the fonts directory. Thus, the application was failing citing that it could not use "nil" to find a font.

To fix this issue, I had to consider the best way around the problem. It seemed that "ver" function was Windows' equivalent to uname, and so I initially attempted to use "ver" in place of uname. Unfortunately, it seemed that MRuby was incapable of accessing ver (when I tested it on a different system), meaning that I had to find an MRuby-inclusive way of achieving the same result.

The solution I came to, in the end, was to compile MRuby with the "dir" mrbgem (mentioned in the first article above). This gem provides the Dir Ruby class, allowing for the traversal and iteration of directories.

Since the above code was aimed at identifying the "font" directory on the OS, I was able to remove the OS dependency and replace it with identifying whether the directory was present. Perhaps not as steadfast as may be required, but works for now: -
Ruby:
          # RPECK 23/12/2021 -- the uname command was not available on Windows
          [macos_font_path, linux_font_path, windows_font_path, openbsd_font_path].each do |folder|
            return folder if File.exists? folder 
          end

This worked, but created a new error. I've forgotten what that error was specifically, but basically came down to some of the C code I changed in "ruby2d.c": -
C:
/*
 * Ruby2D::Text#ext_load_text
 */
#if MRUBY
  static R_VAL ruby2d_text_ext_load_text(mrb_state* mrb, R_VAL self) {
    R2D_Init();

    mrb_value result = mrb_ary_new(mrb);

    mrb_value font, message;
    mrb_get_args(mrb, "oo", &font, &message);

    TTF_Font *ttf_font;
    Data_Get_Struct(mrb, font, &font_data_type, ttf_font); //-> this fixed it but is bad practice 
    //r_data_get_struct(self, font, &font_data_type, TTF_Font, ttf_font);
    // #define r_data_get_struct(self, var, mrb_type, rb_type, data)  Data_Get_Struct(mrb, r_iv_get(self, var), mrb_type, data)

    SDL_Surface *surface = R2D_TextCreateSurface(ttf_font, RSTRING_PTR(message));
    if (!surface) {
      return result;
    }

    mrb_ary_push(mrb, result, r_data_wrap_struct(surface, surface));
    mrb_ary_push(mrb, result, INT2NUM(surface->w));
    mrb_ary_push(mrb, result, INT2NUM(surface->h));

    return result;
  }
#else
I still have not figured out the correct way to get this to work yet, but it compiles and runs without issue, so just leaving it for now!

ZkIXInk.gif


-

I may be partial to attempting to simulate 3D perspective.

I am not 100% sure it can be done, but I can envisage how to do it (generally).

Regarding recreating the original "DOOM", there are 3 main issues I can see (obviously there will be more, but these are the primary ones): -

1. HUD / Player
2. Environment / Map
3. Interactivity

The HUD element isn't difficult at all - literally just a graphical overlay to the window which will update with data attributed to the player.

The environment would be the hardest as you need a means to create polygons and display them in a way befitting the correct perspective. In my head, the DOOM engine does this by taking a 2D projection of a map and extrapolating the dimensions etc with an algorithm. Because we know the floor and ceiling heights, it means you can add data into the vertices to create doors and windows.

The textures need to be bound to objects, which means I'd have to change the core ruby2d engine to allow for texture-mapping on shapes.

Finally, interactivity would be in the form of projectiles, enemies, doors etc. I have not done work on that before so cannot say how to do it. It's not difficult if your engine supports traversing the environment with collision detection etc. The hard part would come from the simulated perspective.

I may write another article explaining how I'd see it working. I will likely end up giving up on it to focus on some other stuff.

This seems to be a good tutorial on how to achieve 3D perspective, initially with 2D then 3D. I am tempted to try and recreate the 2D part: -
View: https://www.youtube.com/watch?v=HQYsFshbkYw&ab_channel=Bisqwit

There is also an excellent book covering the "id Tech 1" / "Doom" game engine: -
 

rpeck90

Gold Contributor
Speedway Pass
User Power
Value/Post Ratio
442%
Nov 26, 2016
317
1,401
34
United Kingdom
Game Dev 101

I'll write this here to give me a place to vent, if you're not bothered that's fine.

Most of the following came from these resources: -
I have never written a game nor am I experienced with C. The following is high-level "pattern" stuff.

-

Game development is similar to general software development, except for a dependence on what's called the "Game Loop".

This is an infinite loop which sits at the heart of the game application - responsible for calculating and simulating the interactivity of the game.

Collision detection, rendering updates and object logic are handled by it.

-

I'll briefly explain how software applications work, then how "games" work and finally how that applies to R2D.

I'm only using R2D because it's simple. There are plenty of other frameworks/systems that achieve a similar result. Gosu seems to be another one for Ruby.

--

How Software Works

Software works with 3 layers: -
  • Presentation (GUI)
  • Logic
  • Data
This pattern is the same for all software - the few exceptions typically negate the use of a substantive "data" layer.


In terms of building an application, you're using different "technology stacks" to achieve the above.

How that's done depends on the stack, how the application is to be used and what type of data it's meant to process.

For a game, the majority of the data will be local. This will include assets (game textures, sounds, fonts etc) as well as any miscellaneous extras the game may required to run. For web applications, the data may be stored externally and pulled into the presentation layer via HTTP.

-

The most important part of the software stack is the "data" layer, as this is where all of the "stuff" is kept.

We've seen the importance of this with the monolith web technology companies - Facebook, Google, Netflix, Amazon, OnlyFans, Twitter, YouTube, Instagram, TikTok host other people's data. For local applications, the "data" layer determines what gets shown on screen.

With games, the most important consideration is how the above can be pulled together into a single, simple, package that the user can engage on their system of choice. One of the reasons I chose to write about Ruby2D is because it may give someone the opportunity to build a "native" (x86) application without having to learn C/C++.

In other words, the target software stack could be desktop, Android or iPhone. To target these, you would normally use the various packages meant for their development (xcode for example). If you apply the logic and presentation layer to a pre-built framework, you negate the need for these, cutting costs as a result.

-

To briefly explain "web" applications, their prevalence is due to the accessibility of web browsers. Rather than having to install desktop software, you're able to engage with unique data in a "portal". This is where the majority of Web 2.0's value originated.

Web 3.0's value will not be determined by any of the current "crypto" projects, because they are mostly extrapolations of the original innovation behind Bitcoin (similarly to how people tried to copy Facebook by creating a "social network for dog owners").

Nakamoto's breakthrough was getting the "incentive economics" to work for a distributed network. This allowed people to justify investing into the network and, thus, the Bitcoin bubble was born. Every present "crypto" project has been built atop this base ideal.

The next big innovation required to make the paradigm widely adopted would be to link the economic benefits of owning a Bitcoin (or similar crypto token) to "real world" value; a similar task to what Amazon and Google had to do with the early web. This will probably have nothing to do with Bitcoin and will be a commercial product (such as a web browser) that enables the adoption of the decentralized paradigm.

I've mooted this before on the forum - my opinion of W3.0 will come from an "open" market, which will work opposite to how commerce does today. IE rather than having to beg a company for a price, you will simply list your wants and businesses will bid for the work. Each business could have its own crypto coin/token and that's where the economic incentive would be upheld.

As with all technology, a "killer app" is required to make that work. I am not sure what the killer app would be for the above. It would have to be "something" that people cannot get anywhere else; a cheaper price, better product or similar. Whoever figures it out could make $100bn+.

In my opinion, "Bitcoin" has no intrinsic value and I have stayed away from crypto for that reason. There is no reason why 1 BTC is worth anything more than the cost of a transaction and I have yet to hear any practical explanation dispelling that assertion.

-

The key factor with software is the process behind it.

Most seem to miss the commercial value of a product comes from its ability to help its user improve their life. Whilst the PC boom introduced many to the idea that they could "digitize" their processes, there are a innumerable companies able to do that now.

Independent software vendors have an edge with the innovative nature of their solutions. For example, creating a "weight loss" app is not about being able to track your progress or access to content... but providing an edge which achieves life changing results.

The potency of those results is where the value lies.

--

How Games Work

Games are built around the game loop (explained above).

I don't have any experience with 3D games, but have researched 2D ones.

I'll briefly explain the difference: -
  • 3D games create a mathematical 3-dimensional world, in which geometric objects are instantiated and computed. The processing power and logic required to calculate this world is substantive. Graphics are applied on top of the geometry. A good breakdown can be found here.

  • 2D games use pre-rendered images (sprites) to create the illusion of movement and (in some cases) perspective. Because 2D games do not have to render anything except images, the required compute power is significantly less.
From what I've gathered, all games work in a similar way (regardless of 2D or 3D): -
  • Objects are invoked into a worldview
  • The game awaits input from the user - typically via a keyboard & mouse or controller
  • Upon processing the inputs, the game uses logic to affect changes to each of the invoked objects
  • If any of the objects collide, or require some other interaction, the game engine affects properties of said objects
  • This is how the illusion of interactivity is created
The "game loop" provides a means through which to update and manage the objects on screen.

For example, if you shoot a gun, the input is processed by the engine and passed to the logic layer. The logic layer will create a new projectile and update the player's object so they are unable to shoot until their gun has been reloaded. It will also update the ammunition of the gun.

Whilst the projectile is flying, it will be a new interactive object in the world. It will have a trajectory and velocity, which will propel it forward. If it collides with another object (for example an enemy), a collision algorithm will trigger, which will set off a series of other logic code (such as how much HP to remove from the enemy, whether the enemy's state should change etc).

The part which glues this together is the rendering. By showing the user that a gun has been fired, it creates a level of immersion that tricks the brain into thinking it's performing the activity. This is the basis of why video games have such a hold over people's imaginations.

-

To give a brief example of how a 2D engine would work, take some of the original DOOM.

There is a good article explaining the original DOOM engine here.

I don't know the technicalities of how they implemented the various aspects of the engine in terms of C (I do know but am not proficient enough with the language to explain them). I can, however, give a brief description of how it all fits together: -

k4svYh7.png

  1. HUD - information pertaining to the player (how much health they have remaining, armour, guns, ammo)
  2. Player object (sprite changes depending on weapon; animation changes depending on state)
  3. Interactive object(s) (enemies and destructible objects such as barrels)
  4. Environment rendering (levels and enemies)
As mentioned previously, the HUD is simply a series of bitmap imagery placed on top of everything. This is not difficult.

The player object is "static" in the sense that it is always in the centre of the screen. Due to the nature of FPS, there is no need to change this - replicating it would not be difficult as you are only really dealing with different sprites. There is no movement or other computation required.

The enemy objects are, computationally, not much of a problem either. In the case of DOOM, they are always facing the player. This means they can be rendered as 2D sprites with different "directions" baked into the sprite-sheet: -

ITEMS4.PNG


The hardest part is 4. I am not sure whether I'd be able to create computationally-effective perspective, which is essentially the big thing that DOOM got right. DOOM's maps are2 dimensional, extrapolated into 3D by extending the walls upward: -

Doom_E1M1.gif


DOOM's map data is contained in WAD files (see the 3-tier approach above).

This data is loaded by the engine, rendering the likes of the above. This is all computed (no graphics), meaning that it's all rendered inside the application itself (rather than being a graphic). The part that makes it work is to take the above and make it display with walls and a ceiling.

Accurately replicating this engine's functionality would depend on getting this to work.

--

Ruby2D

To briefly explain how to get R2D working for game dev, there are several features that need to be discussed: -

-

Game Loop

The "game loop" in Ruby2D is invoked with the following code: -
Ruby:
update do
  # something here
end
This is called in the ruby file which acts as the entry point into your application: -
Ruby:
# example.rb
require 'ruby2d'

t = Time.now

update do
  if Time.now - t > 5 then close end # Close the window after 5 seconds
end

show
The "game loop" gives you access to the various objects declared above it, allowing you to manipulate them as required.

For example, with the simple triangle demo I created, this is how the code looks: -

nfmFfGq.gif


Code: -
Ruby:
# Libraries
require 'ruby2d'
# Constants
VELOCITY = 10
# Details
# Allows us to ensure we're able to set the Window dimensions
set title: "Test Ruby2D", background: 'black', icon: 'icon.png'
# Random number generator (mruby does not support rand(x..y))
def random_int(min, max)
    rand(max - min) + min
end
# Star
class Star
    def initialize
        @y_velocity = random_int(-3, 0.1)
        @shape = Circle.new(
            x: rand(Window.width),
            y: rand(Window.height),
            radius: random_int(0.1, 0.5),
            color: 'random',
            z: -2,
            opacity: random_int(0.2, 0.8)
        )
    end
    def move
        @shape.y = (@shape.y + @y_velocity) % Window.height
    end
end
# Objects
@stars    = Array.new(100).map { Star.new }
@triangle = Triangle.new(
  x1: 50,  y1: 0,
  x2: 100, y2: 100,
  x3: 0,   y3: 100,
  color: ['fuchsia', 'red', 'green'],
  z: 100
)
# Position
@x_offset = 0
@y_offset = 0
@z_offset = 0
# Key
# Handle key event
on :key_held do |event|
    case event.key
        when 'left'
            @x_offset = -(VELOCITY)
        when 'right'
            @x_offset = VELOCITY
        when 'up'
            @y_offset = -(VELOCITY)
            @z_offset = VELOCITY
        when 'down'
            @y_offset = VELOCITY
            @z_offset = -(VELOCITY)
    end
end
on :key_down do |event|
    case event.key
        when 'space'
            text = Text.new(
                "Hello! This is a test!!!",
                style: 'bold',
                size: 20,
                color: 'blue',
                z: 10
          )
          text.x = (Window.width - text.width) / 2
          text.y = (Window.height - text.height) / 2
    end
end
on :key_up do |event|
    case event.key
        when 'left', 'right'
            @x_offset = 0
        when 'up', 'down'
            @y_offset = 0
    end
end
# Game Loop
# This is the game loop which runs infinitely
update do
    unless ((@triangle.y1 + @y_offset) < 0) || ((@triangle.y2 + @y_offset) < 0) || ((@triangle.y3 + @y_offset) < 0) || ((@triangle.y1 + @y_offset) > Window.height) || ((@triangle.y2 + @y_offset) > Window.height) || ((@triangle.y3 + @y_offset) > Window.height)
        @triangle.y1 += @y_offset
        @triangle.y2 += @y_offset
        @triangle.y3 += @y_offset   
    end
  
    unless ((@triangle.x1 + @x_offset) < 0) || ((@triangle.x2 + @x_offset) < 0) || ((@triangle.x3 + @x_offset) < 0) || ((@triangle.x1 + @x_offset) > Window.width) || ((@triangle.x2 + @x_offset) > Window.width) || ((@triangle.x3 + @x_offset) > Window.width)
        @triangle.x1 += @x_offset
        @triangle.x2 += @x_offset
        @triangle.x3 += @x_offset  
    end
    @stars.each { |star| star.move } if Window.frames % 2 == 0
end
show
The bottom part is a mess so ignore that for now (it's the bounding box collision code).

I took the "stars" from the following: ruby2d-games/asteroids_v3.rb at main · mariovisic/ruby2d-games

-

Objects

Like most other "DIY" libraries, there are a series of "objects" which are present inside R2D. These objects give you the opportunity to offload most of the background work to the library: -
  • Window
    Gives you the ability to interact with and manage the "window" displayed to users. As it is a "global" object, it means you can use and interact with it at all levels of your application (IE in classes).

  • Audio
    Ability to engage various audio files in the app, either as background music or for specific events. Good for allocating to interactive objects (such as if a projectile collides with an enemy).

  • Inputs
    Capturing inputs from the user across keyboard, mouse and controller. I'm not sure whether the controller works well, but the keyboard side of it does. Whilst all apps have the ability to manage user inputs, I think the Ruby way of doing it is especially simple.
If we take the example above (where I've created a simple bounding box using the Window object):-

Code:
((@triangle.y3 + @y_offset) > Window.height)

This takes the sum of the triangle's "y3" index and the addition "y" co-ordinate we want to add, and compares it against Window.height. If it is greater, then the code is not executed.

I'll write more about this later.

--

Electron

Finally, I wanted to highlight something interesting.

If you think it's "cheating" that you are able to code in a much simpler language and compile into C/C++ later, consider the Electron framework: -


This powers the likes of MSTeams and VSCode - takes HTML / Javascript applications and turns them into desktop ones.

I've never used it so cannot comment on simplicity/efficacy, but I can say that the applications it helps create are both effective and robust.

Many of the leading "web" application vendors (including Twitch) apparently use it to power their desktop offering.

The importance of this is that, if you run a popular online service, this type of technology gives you the ability to create a desktop version.

You get all of the benefits of a "native" desktop deployment without having to worry about porting your application to C/C++. This not only cuts costs but makes your service more accessible (if done properly).

--

Thanks for reading.

In the next article, I will see about working up to creating the DOOM perspective thing I talked about.

I'm not a professional game dev, this is how I learn. You're welcome to ask questions and/or post criticisms if you want.
 

Andreas Thiel

Silver Contributor
FASTLANE INSIDER
Read Rat-Race Escape!
Read Fastlane!
Read Unscripted!
Speedway Pass
User Power
Value/Post Ratio
112%
Aug 27, 2018
626
702
43
Karlsruhe, Germany
Interesting thread.

A few remarks:
  • I would not agree that using Ruby2D makes game development easier than the more obvious approaches (using popular engines, using C++ or C)
  • I have looked into using Ruby for game development and my one big requirement was that it has to be possible to use OpenGL or Vulkan somehow. Didn't seem to be the case, or at least there were painful compromises if I remember correctly. If you are writing your own rasterization engine it should only be considered a learning experience without high hopes of launching a product based on the technology and you certainly run into the opposite direction of making game development any easier if you choose this path
  • You wrote that the graphics library that is used is called Simple2D ... and there is a library with that name out there ... but everything I see makes be believe that it is actually the Simple DirectMedia Layer (libsdl) 2.0 library that is used (but maybe the former just builds on the latter?)
  • There is a great book about the rasterization theory: "Mathematics for 3D Game Programming and Computer Graphics". It breaks down what more modern engines do with transformation matrices and projections.
  • MRuby would be another high risk aspect in my book, because I have little faith in tools that create those executable files. Usually you run into some limitations with these solutions
These days it might not be reasonable to reimplement things exactly the way they were implemented in the original Doom game. As I understand it, portals for culling were required because resource limitations were really tough back then.
It might make a lot more sense to parse the maps into your own intermediate format and look into more modern culling approaches.

I suppose without OpenGL or Vulkan the actual render functionality would either boil down to
1. single SDL blit calls for warped image textures per polygon
2. one huge blit call if you render to one SDL surface in memory (with double buffering) and blit that one image to the screen to render the next frame

For 1. it would be interesting to see if that is viable or not. On the one hand my experience with single blit calls is that the overhead can be so expensive that they are not viable.
Then again, I tried to create a 2d tile based game in somewhat early Android days. These days a doom level might render at a framerate of 60 even with high quality textures on high resolution screens, but it is an assumption that should be validated. Image manipulation for approach 2 is also somewhat costly. Don't expect the solutions (software rasterization engine) to scale to deal with hundreds of thousands of visible polygons once you have your Doom clone.
Hardware acceleration for floating point operations were required to make that viable.
 
Dislike ads? Remove them and support the forum: Subscribe to Fastlane Insiders.

rpeck90

Gold Contributor
Speedway Pass
User Power
Value/Post Ratio
442%
Nov 26, 2016
317
1,401
34
United Kingdom
Movement etc

I created a simple demo, which still needs work to get collisions to function correctly.

It's not simulated perspective, that will have to come later: -

mUMNa1q.gif


I wanted to replicate the following: -


I will briefly explain what I did to get the above.

Again, I still need to get the collisions to work and we can work on moving the map at a later time.

--

Structure / Setup

You can see my code repository here: -

There are 4 main classes:
  • Player
    The central element controlled by the user. In our case, the red dot and the small white line.

  • HUD
    The text/information displayed on the screen. This would be the equivalent of the "health/armour/ammo" indicators in the likes of Doom.

  • Map
    Information pertaining to the walls/geometry of the map. This is not done yet, it's just hard coded with some lines.

  • Projectile
    The small "bullets" our player will shoot. This is just a demo so this does not need to be too fancy - it's just a series of small circles at present.
The program works by instantiating the classes into "instance" variables (class level scope) and then providing a means to change/alter the velocity of said objects through the keyboard arrow inputs.

The most important part was creating a means to "rotate" the player. This was extremely difficult and I'll explain how it works in a second.

This is the code for the main file (this will change depending on how I fix the collision stuff above) -
Ruby:
# Libraries
require 'ruby2d'

# Objects
if RUBY_ENGINE != 'mruby'
    %w(player map projectile hud).each do |file|
        require_relative "lib/#{file}"
    end
else
    require File.expand_path("../lib/player", __FILE__)
    require File.expand_path("../lib/map", __FILE__)
    require File.expand_path("../lib/projectile", __FILE__)
    require File.expand_path("../lib/hud", __FILE__)
end

# Window
# Set title, dimensions etc
set title: "Perspective Test", background: 'black', width: 850, height: 550

# Objects
# Loaded at start so they provide the engine with the means to calculate the entire experience
@player      = Player.new # player animation in the center of the screen
@map         = Map.new    # Map interface (creates walls/vertices which can then be traversed with the game code below)
@hud         = HUD.new    # Display information and options to the user
@projectiles = []         # Projectiles array (used to define which projectiles the user has fired)

# Constants
# Static values
VELOCITY = 10
ANGLE    = 5

# Inputs
# Take the user's inputted keystrokes and updates worldview
on :key_held do |event|
    case event.key
        when "left"
            @player.angle_velocity = -(ANGLE)
        when "right"
            @player.angle_velocity = ANGLE
        when 'up'
            @player.velocity = VELOCITY
        when 'down'
            @player.velocity = -(VELOCITY)
    end
end

# Keys
# Single button clicks (no need to hold as above)
on :key_down do |event|
    case event.key
        when "space"
            @projectiles.push Projectile.new(@player.angle, @player.x, @player.y)
    end
end

# Stop
# When key input ceases, stop updating the x,y of the user
on :key_up do |event|
    case event.key
        when 'left', 'right'
            @player.angle_velocity = 0
        when 'up', 'down'
            @player.velocity = 0
    end
end

# Game Loop
# This is the game loop which runs infinitely
update do

    # HUD
    @hud.update projectiles: @projectiles

    # Player
    @player.update_angle if @player.angle_velocity != 0
    @player.update_velocity @map.walls if @player.velocity != 0

    # Projectiles
    @projectiles.each { |projectile| projectile.move(VELOCITY) unless !projectile.state } if @projectiles.any?
  
end

# Show Window
show

--

Code

The code above works as follows: -
  1. Call the various "library" files which exist in the "lib" directory (these define the classes for the app)
  2. Instantiate the classes provided by said libraries (Player.new etc)
  3. Define some constants (you'd have a lot of these if you had a full blown app)
  4. Create the "input" logic (if arrow buttons are held down etc)
  5. Use the game loop to update any of the objects present in the worldview (Player/HUD/Projectiles)
I'll explain each here: -

-

Library Files

As with all other high level languages, calling library files gives you the ability to "import" code from those files into your app. You're then able to call the functionality they contain in your main logic functions: -
Ruby:
# Ignore the "mruby" stuff - because mruby does not have any 'require' functionality, I had to create a hack to get the app to build. require_relative is sufficient - https://apidock.com/ruby/Kernel/require_relative
if RUBY_ENGINE != 'mruby'
    %w(player map projectile hud).each do |file|
        require_relative "lib/#{file}"
    end
else
    require File.expand_path("../lib/player", __FILE__)
    require File.expand_path("../lib/map", __FILE__)
    require File.expand_path("../lib/projectile", __FILE__)
    require File.expand_path("../lib/hud", __FILE__)
end

The library files I created just represent classes. They are the likes of the following: -
Ruby:
# ./lib/player.rb

## Player ##
## Used to provide context to player ##

class Player

  ## Attr Accessors ##
  ## Allows us to call @player.x ##
  attr_accessor :angle, :velocity, :angle_velocity, :x, :y
  
  def initialize

    # Dot (object)
    @dot = Square.new(
      size: 5,
      color: 'red',
      z: 1
    )
    @dot.x = (Window.width - @dot.size) / 2
    @dot.y = (Window.height - @dot.size) / 2

    # Line (direction)
    @line = Line.new(
      x1: @dot.x + 3, y1: @dot.y,
      x2: @dot.x + 3, y2: @dot.y - 35,
      width: @dot.size,
      color: 'silver',
      z: 0,
      opacity: 0.2
    )

    # Vars
    @angle = 0 # direction (defaults to 0 and is maintained with the line)
    @angle_velocity = 0 # increments at which angle will change (IE += 0.1)
    @velocity = 0 # speed (forward/backwards)
    @x = @dot.x # x
    @y = @dot.y # y

  end

  # Update Angle
  def update_angle
    @angle = (@angle + @angle_velocity) % 360
    radians = @angle_velocity * (Math::PI / 180)
  
    x2 = @line.x2 - @line.x1
    y2 = @line.y2 - @line.y1
    cos = Math.cos(radians)
    sin = Math.sin(radians)
  
    @line.x2 = ((x2 * cos) - (y2 * sin)) + @line.x1
    @line.y2 = ((x2 * sin) + (y2 * cos)) + @line.y1
  end

  # Update Velocity
  def update_velocity walls
    radians = @angle * (Math::PI / 180)

    x = Math.sin(radians) * @velocity
    y = Math.cos(radians) * @velocity

    unless (@dot.x + x) < 0 || (@dot.x + x) >= Window.width
      unless walls.contains? (@dot.x + x), (@dot.y - y)
        @dot.x += x
        @line.x1 += x
        @line.x2 += x
      end
    end

    unless (@dot.y - y) < 0 || (@dot.y - y) >= Window.height
      unless walls.contains? (@dot.x + x), (@dot.y - y)
        @dot.y -= y
        @line.y1 -= y 
        @line.y2 -= y
      end
    end

    # Position
    # Update global position value for player (used in other classes)
    @x = @dot.x
    @y = @dot.y
  end
 
end
This code is included in the main file, allowing us to work with the class it defines.

If you want to know what a class does, it's basically an "object".

An object is instantiated into the global scope (worldview) and held in memory. It has a series of attributes which can be manipulated in real time. An example of such an attribute could be the player's Hit Point (HP) pool.

-

Classes

After being imported into the main file, the code for the classes is available within the scope that they were imported into.

In the above example, I imported them into the "main" file, meaning they are available globally, but not locally. IE if I wanted to call Player.new inside the "Map" class, I would have to include the player.rb file at the top of the map file.

Instantiating the objects at the top of the file means you are able to manage/interact with them at the bottom of it: -
Ruby:
# Objects
# Loaded at start so they provide the engine with the means to calculate the entire experience
@player      = Player.new # player animation in the center of the screen
@map         = Map.new    # Map interface (creates walls/vertices which can then be traversed with the game code below)
@hud         = HUD.new    # Display information and options to the user
@projectiles = []         # Projectiles array (used to define which projectiles the user has fired)
By setting instance variables (in Ruby, done using the "@" prefix), it makes these variables available at the "class" level.

In our case, this is not important (we could use local variables without issue) - the point is that by declaring and defining the variables at the top of the file, said variables are available to be manipulated wherever we need them.

As is the case with all OOP (Object Oriented Programming), by having access to the variables at different points of the app, you're able to 1) infer 'real time' values from the objects + 2) use the attributes/methods of the object to affect behaviour.

To give an example of how this works, let's consider the "Player" class (code above).

There are several attributes we declare at the top of its file: -
Ruby:
attr_accessor :angle, :velocity, :angle_velocity, :x, :y
In Ruby, attr_accessor creates a getter + setter method for the attribute you define.

By defining these attributes, you are able to interact with them within your app.

For example: -
Ruby:
  @player = Player.new # - invokes a new instance of the "Player" class to the @player variable
  puts @player.x # - accesses the "getter" method set by attr_accessor to output the "@x" value within the class
This means that you are able to populate classes with data and have that data made available to other parts of the application.

I'll explain the specifics of how the classes work together later.

-

Constants

All software revolves around the manipulation of data using a combination of constants and variables.
  • Variables are small blocks of data which the developer will populate, either from the user's inputs or from the "data layer" backend (see 3 tier info above). Variables are meant to change.

  • Constants are values which do not change. They are mostly used to indicate specific values used within the software - things such as volume level and window size. I'm sure others can explain them better.
In the above app, we've set two constants: -
Ruby:
# Constants
VELOCITY = 10
ANGLE    = 5
These simply denote the "steps" required for 1) the forward/backward movement of the player (velocity) and 2) the rate at which their "angle" will change.

If I increased velocity to 20, it should double the movement speed. If I increased the angle to 10, it should double the "turning radius" of the player object.

Whilst these are the only two values assigned to constants presently, it is here you would define any other constants your application may require.

-

Input Logic

This would normally be placed within the "game loop" (if you were developing in C/C++), but since we're just using Ruby2D, we can take advantage of their "input" functionality: -
Ruby:
# Inputs
# Take the user's inputted keystrokes and updates worldview
on :key_held do |event|
    case event.key
        when "left"
            @player.angle_velocity = -(ANGLE)
        when "right"
            @player.angle_velocity = ANGLE
        when 'up'
            @player.velocity = VELOCITY
        when 'down'
            @player.velocity = -(VELOCITY)
    end
end

# Keys
# Single button clicks (no need to hold as above)
on :key_down do |event|
    case event.key
        when "space"
            @projectiles.push Projectile.new(@player.angle, @player.x, @player.y)
    end
end

# Stop
# When key input ceases, stop updating the x,y of the user
on :key_up do |event|
    case event.key
        when 'left', 'right'
            @player.angle_velocity = 0
        when 'up', 'down'
            @player.velocity = 0
    end
end
I'll explain the specifics of this in a minute.

For now, there are three "input" events captured: -
  1. Arrow keys held (up, down, left, right)
  2. Space is pressed
  3. Arrow keys released (up, down, left, right)
The space input creates a new projectile.

The arrow inputs change two values - the player's "velocity" (forward/backward motion) and the player's "angle" (rotational direction). Combining the two gives us the ability to "move" the player as demonstrated in the GIF above.

Releasing the arrow keys brings the various velocity values back down to 0 (stopping the player's movement on screen).

I'll discuss how it works in a minute.

-

Game Loop

This updates the various elements in the worldview: -
Ruby:
# Game Loop
# This is the game loop which runs infinitely
update do

    # HUD
    @hud.update projectiles: @projectiles

    # Player
    @player.update_angle if @player.angle_velocity != 0
    @player.update_velocity @map.walls if @player.velocity != 0

    # Projectiles
    @projectiles.each { |projectile| projectile.move(VELOCITY) unless !projectile.state } if @projectiles.any?
  
end
This is constantly firing the functions attached to the likes of "@player.update_angle".

Things happen when the values those functions manage change - for example, if you have the up/down/left/right arrows pressed, the "velocity" variables change, which will affect how the object is represented on the screen.

What confused me about this paradigm is how the "game loop" does NOT need to manage/define the various elements required by the application. You would not declare "@Player = Player.new" inside the game loop as that would continually create a new "player" object when you don't want/need that.

--

How It Works

To give insight into how it all fits together, the following is the general "flow" of the application: -
  1. Create a "player" object and place them at the center of the screen
  2. Take inputs to move the player object
  3. If the player wishes to fire a projectile, create a new projectile object with the same angle as the player and velocity
  4. The player *should* collide with the yellow lines (map), but I have not been able to implement that yet (the problem is the velocity adds 10 to the x/y value, and the line is only 2 px wide, meaning that it often misses)
Since it took me some time to get things working properly, I'll do my best to explain everything below.

-

Player

The "Player" object is the center of the system.

It works with two elements:-
  1. Dot
  2. Line
VAyJnXl.png


The dot is simple: -
Ruby:
    @dot = Square.new(
      size: 5,
      color: 'red',
      z: 1
    )
    @dot.x = (Window.width - @dot.size) / 2
    @dot.y = (Window.height - @dot.size) / 2
When the "Player" class is instantiated, the "@dot" variable is declared. This is an instance variable, meaning it is available within the scope of the instance of the Player class.

Since we have not added a public "dot" attribute to the Player class, there is no way to engage with the "dot" variable from outside the class. The dot is placed in the center of the window (height - dot_size)/2.

The line is more difficult: -
Ruby:
    # Line (direction)
    @line = Line.new(
      x1: @dot.x + 3, y1: @dot.y,
      x2: @dot.x + 3, y2: @dot.y - 35,
      width: @dot.size,
      color: 'silver',
      z: 0,
      opacity: 0.2
    )
This creates the line on the same X axis as the dot (the +3 is because of some weird bug with positioning) and it then has two "y" co-ordinates -- the first being the same as the dot and the second being 35 pixels higher.

This is standard programming - two elements stacked on top of each other. The dot has a higher "z" value, placing it nearer to the user in the renderer.

The difficulty comes from moving the player - particularly as it pertains to the line: -
FimNyHa.gif


I had to create a means to calculate the angle of the user's direction, which is something I had never done before.

To do it, I basically looked up a bunch of people much smarter than me at maths and found the formulae to use. To briefly explain what was done, consider the way it works as thus: -
  • There are two publicly accessible values for "player" - angle and velocity.

  • Angle is the angle which the user (using the left/right keys) has defined and velocity is dependent on whether the up/down keys are being pressed.

  • Each time the app updates (via the game loop), these values are constantly being evaluated. However, it's only when you press a key on the keyboard that they are populated with anything other than 0.

  • This means that when you hit left/right, the app will add "5" to the angle provided to the line. This angle can then be computed using the formula I found to give us a direction through which to redraw it.

  • After this, you would then take the up/down input and use that to apply either a "forward" or "backward" velocity to the entire object. The difficulty there was making this work with the "direction" I'd created with the angle.
To cite the code, here's how it works: -

1. Left/Right is inputted into the keyboard (changes the "direction" / angle of the line)
2. Up/Down is inputted (changes the "velocity" of the whole object): -
Ruby:
# Inputs 
# Take the user's inputted keystrokes and updates worldview
on :key_held do |event|
    case event.key 
        when "left"
            @player.angle_velocity = -(ANGLE)
        when "right"
            @player.angle_velocity = ANGLE
        when 'up'
            @player.velocity = VELOCITY
        when 'down'
            @player.velocity = -(VELOCITY)
    end
end

3. In the "game loop", the player's "update_angle" and "update_velocity" functions are continually being called. Because the above populates those functions with data (+/- 10 and +/- 5 respectively), it uses that data to change the way in which the various parts of the object are rendered: -
Ruby:
# Game Loop
# This is the game loop which runs infinitely
update do 
    # HUD
    @hud.update projectiles: @projectiles, angle: @player.angle
    # Player
    @player.update_angle if @player.angle_velocity != 0
    @player.update_velocity @map if @player.velocity != 0
    # Projectiles
    @projectiles.each { |projectile| projectile.move(VELOCITY, @map) unless !projectile.state } if @projectiles.any? 
    
end

4. The update_angle function changes the "angle" at which the line is drawn and populates the "@angle" variable inside the player object. I'll explain this function shortly: -
Ruby:
  # Update Angle 
  def update_angle 
    @angle = (@angle + @angle_velocity) % 360
    radians = @angle_velocity * (Math::PI / 180)
    
    x2 = @line.x2 - @line.x1
    y2 = @line.y2 - @line.y1
    cos = Math.cos(radians)
    sin = Math.sin(radians)
    
    @line.x2 = ((x2 * cos) - (y2 * sin)) + @line.x1
    @line.y2 = ((x2 * sin) + (y2 * cos)) + @line.y1
  end

5. The update_velocity function updates the direction of the dot+line using the new angle provided by update_angle: -
Ruby:
  # Update Velocity
  # This includes some redundant collision code (map)
  def update_velocity map
    radians = @angle * (Math::PI / 180)
    x = Math.sin(radians) * @velocity
    y = Math.cos(radians) * @velocity
    unless (@dot.x + x) < 0 || (@dot.x + x) >= Window.width
      unless map.contains? (@dot.x + x), (@dot.y - y)
        @dot.x += x
        @line.x1 += x
        @line.x2 += x
      end
    end 
    unless (@dot.y - y) < 0 || (@dot.y - y) >= Window.height
      unless map.contains? (@dot.x + x), (@dot.y - y)
        @dot.y -= y
        @line.y1 -= y   
        @line.y2 -= y
      end
    end 
    # Position
    # Update global position value for player (used in other classes)
    @x = @dot.x 
    @y = @dot.y
  end
To explain how the angle is calculated:
  • Each time the user inputs the left/right keys on their keyboard, a value is added to or subtracted from the "angle_velocity" value for the class. This represents how much change should be applied to the "angle".

  • For example, keeping left pressed will make "angle_velocity" -5 (the value of our ANGLE constant).

  • This value is then used by the "update_angle" function to add the "angle_velocity" (IE -5) to the current "@angle" value. Thus, if you have an angle of 0, pressing left once should change that angle by -5.

  • I had to use the modulo operator to convert this raw number (which would typically become huge) into what it would be divisible by 360 (IE the number is kept within the 360 degrees of a full circle).

  • This is fine and works well.

  • The problem is turning this into x,y co-ordinates for the line to be redrawn. That was extremely difficult as I had to figure out how to convert an "angle" (IE 90) into an updated set of co-ords. I relied on the following to understand how to do it: 1. How do we rotate points? (video) | Khan Academy
I'm not going to explain how I managed to get it to work, I'll just explain what it does: -

Firstly, translate the angle velocity (IE how much we want to change the angle by) into "radians". I found out about this here: Convert degree to radians in ruby
Ruby:
radians = @angle_velocity * (Math::PI / 180)
Secondly, create a set of points which are used to determine the base x & y values for the line (IE primary values).
Ruby:
x2 = @line.x2 - @line.x1
y2 = @line.y2 - @line.y1
Thirdly, get the COS and SIN values for the radians.
Ruby:
cos = Math.cos(radians)
sin = Math.sin(radians)
Finally, update the line's furthermost X + Y values to the new co-ords. I found this formula on StackOverflow, but have forgotten the link now.
Ruby:
@line.x2 = ((x2 * cos) - (y2 * sin)) + @line.x1
@line.y2 = ((x2 * sin) + (y2 * cos)) + @line.y1

Lots of trial/error lead to the above code, which works to spin the line around the central "dot".

This gives us the means to change the "direction" of the player, now we have to use it to change the "direction" the entire user object "travels". To do this, you have to take the new angle (stored in the "@angle" instance var) and change the entire set of player co-ordinates based on it: -
maV5RNS.gif


The code to do this is the "update_velocity" function posted above: -
Ruby:
  # Update Velocity
  def update_velocity map
    radians = @angle * (Math::PI / 180)
    x = Math.sin(radians) * @velocity
    y = Math.cos(radians) * @velocity
    unless (@dot.x + x) < 0 || (@dot.x + x) >= Window.width
      unless map.contains? (@dot.x + x), (@dot.y - y)
        @dot.x += x
        @line.x1 += x
        @line.x2 += x
      end
    end 
    unless (@dot.y - y) < 0 || (@dot.y - y) >= Window.height
      unless map.contains? (@dot.x + x), (@dot.y - y)
        @dot.y -= y
        @line.y1 -= y   
        @line.y2 -= y
      end
    end 
    # Position
    # Update global position value for player (used in other classes)
    @x = @dot.x 
    @y = @dot.y
  end
To break this down, this code does not take any input, as the "@velocity" attribute of the "@Player" object has been updated in the main file. This means that we just need to take the "@angle" value (again, updated by the "update_angle" function) and use it to determine the new co-ordinates for the line + dot.

Like the previous code, I used a lot of reference material to find out how to do it. I think this was the main reference I used: C++ Move 2D Point Along Angle

This told me that no super complicated calculations were required - it was basically a case of taking the present "x" value and adding the sin value of the angle and distance to it. Same for y, except for cos.

The above code takes the radians of the player's angle, applies them to the formula from the StackOverflow link and then does some simple checks to see if a) the dot is outside the window + b) it has collided with any walls.

The walls code is not working yet. However, the window bounding box code is and works well.

The net result is the line + dot now update along the angle/direction provided by the "update_angle" function.

-

Projectiles

The projectiles were done similarly to the "update_velocity" function above.

The crux is that they are instantiated with a velocity & angle, neither of which changes. It's the equivalent of holding down the "up" key on a certain direction for the dot/line...

qJ3RX8X.gif


This is the code for the projectile class: -
Ruby:
## Projectile ##
## Projectiles fired by the user (takes angle as argument) ##

class Projectile < Circle

    # Attributes
    attr_accessor :angle, :state, :velocity
      
    def initialize(angle, x = 0, y = 0)
        super(
            color: 'white',
            z: 10
        )

        # Required for MRuby
        self.radius = 2
        self.x = x
        self.y = y

        # Vars
        @state = true # true/false
        @angle = angle # passed from constructor
        @velocity = 0 # speed/movement

    end

    # Move 
    def move(velocity)
        @velocity = velocity 

        radians = @angle * (Math::PI / 180)

        x = Math.sin(radians) * @velocity
        y = Math.cos(radians) * @velocity

        self.x += x
        self.y -= y

        # Out of bounds
        set_state(false) if self.x < 0 || self.x > Window.width || self.y < 0 || self.y > Window.height
    end

    # Status
    def set_state toggle = true
        @state = toggle
        self.remove if toggle == false
    end
      
  end
Each time the user pressed the space bar, the following code is called: -
Ruby:
# Keys 
# Single button clicks (no need to hold as above)
on :key_down do |event|
    case event.key 
        when "space"
            @projectiles.push Projectile.new(@player.angle, @player.x, @player.y)
    end
end
This creates a new Projectile object with the angle, x + y co-ords of the "player" object and then lets the game loop to update the projectiles depending on whether their state is "true": -
Ruby:
# Game Loop
# This is the game loop which runs infinitely
update do 

    # Projectiles
    @projectiles.each { |projectile| projectile.move(VELOCITY) unless !projectile.state } if @projectiles.any? 
    
end
The projectile "move" method then propels the projectile along the directional path outlined by the same formula used in the "update_velocity" function of the player object.

--

I'll see if I can get the walls collision to work.

If I can do that, it means we have the ability to create a "top down" of experience with walls and guns.

Then we need to get the perspective side of things to work, which is going to be hard.

I'll provide updates if I manage to make any progress!
 

rpeck90

Gold Contributor
Speedway Pass
User Power
Value/Post Ratio
442%
Nov 26, 2016
317
1,401
34
United Kingdom
Interesting thread.

A few remarks:
  • I would not agree that using Ruby2D makes game development easier than the more obvious approaches (using popular engines, using C++ or C)
  • I have looked into using Ruby for game development and my one big requirement was that it has to be possible to use OpenGL or Vulkan somehow. Didn't seem to be the case, or at least there were painful compromises if I remember correctly. If you are writing your own rasterization engine it should only be considered a learning experience without high hopes of launching a product based on the technology and you certainly run into the opposite direction of making game development any easier if you choose this path
  • You wrote that the graphics library that is used is called Simple2D ... and there is a library with that name out there ... but everything I see makes be believe that it is actually the Simple DirectMedia Layer (libsdl) 2.0 library that is used (but maybe the former just builds on the latter?)
  • There is a great book about the rasterization theory: "Mathematics for 3D Game Programming and Computer Graphics". It breaks down what more modern engines do with transformation matrices and projections.
  • MRuby would be another high risk aspect in my book, because I have little faith in tools that create those executable files. Usually you run into some limitations with these solutions
These days it might not be reasonable to reimplement things exactly the way they were implemented in the original Doom game. As I understand it, portals for culling were required because resource limitations were really tough back then.
It might make a lot more sense to parse the maps into your own intermediate format and look into more modern culling approaches.

I suppose without OpenGL or Vulkan the actual render functionality would either boil down to
1. single SDL blit calls for warped image textures per polygon
2. one huge blit call if you render to one SDL surface in memory (with double buffering) and blit that one image to the screen to render the next frame

For 1. it would be interesting to see if that is viable or not. On the one hand my experience with single blit calls is that the overhead can be so expensive that they are not viable.
Then again, I tried to create a 2d tile based game in somewhat early Android days. These days a doom level might render at a framerate of 60 even with high quality textures on high resolution screens, but it is an assumption that should be validated. Image manipulation for approach 2 is also somewhat costly. Don't expect the solutions (software rasterization engine) to scale to deal with hundreds of thousands of visible polygons once you have your Doom clone.
Hardware acceleration for floating point operations were required to make that viable.
Thanks for the kind words.

I'm not experienced with C/C++, so it's easier for me :) Whilst I do aim to change this, I felt it was a good way for a beginner or intermediate coder to start getting involved with dev, that's all. Similar to how Visual Basic used to be.

I have no idea about Vulkan/OpenGL. As mentioned, I really thought it was a good "entry point" type of system to help someone prototype something quickly/cheaply without having to learn memory addressing etc.

I'll take your word regarding the library! Thanks for the heads up.

MRuby is underpowered, I've come to find. However, it's still intriguing to me that we can create an executable application using pure Ruby code. Again, it may not be a perfect solution, but could be something viable for someone who just wants to make some progress.

Maybe we can look at the blit / rendering / rasterization stuff if we manage to create a viable means to clone the original DOOM engine. My intention would be to get the code to fake perspective then translate it into C/C++ afterwards (if I have the time). This could be a cool project which we could look at when the time is right if you wanted.
 

Andreas Thiel

Silver Contributor
FASTLANE INSIDER
Read Rat-Race Escape!
Read Fastlane!
Read Unscripted!
Speedway Pass
User Power
Value/Post Ratio
112%
Aug 27, 2018
626
702
43
Karlsruhe, Germany
I guess where I am going with this is that while you can go for the Ruby2D Doom clone, you might want to reevaluate if that actually if the best course of action for reaching your goals. You could probably create a really great 2D game using the technology. The audience would be Windows desktop PC users.

Creating your own software renderer because you want to use Ruby for a 3D game is a bold decision and, when you are honest about your goals, might that be too much of a detour?

If really understanding the ins and outs of topics like software rasterization and culling is actually something you care about, then I suppose it makes sense to keep going.
If you want to create a foundation for more ambitious projects and figuring out how to roll your own render engine is merely something you realized you'll have to do to get there, then maybe you have better options.

I understand that the Unity Game Engine abstracts many things away and you barely understand what might be going on under the hood, so I think using low level technologies for a few learning projects makes sense.
But all the theory from Game Dev communities says you should approach those first projects with the mindset that they are throwaway code. You will learn so much that you will start over several times in the process.

I have a project / business idea in mind that I want to work on, but there might be enough overlap to work on something game related. So far I was going to look into raytracing, tile engines and shaders.
Was going to use Ruby for web projects around musical notation and maybe payment processing.
But I am about to reevaluate if there might be more reasonable example projects that people will find more relatable.
So yeah, we can talk about if it makes sense to collaborate at some point.

I am not sure porting the software rendering solution from Ruby to C/C++ would make sense.
Ideally you'd create an abstraction layer (for separation of concerns) that allows you to use a completely different (e.g. Vulkan or OpenGL based) rendering implementation, while the way the core engine uses its programming interface stays as it is. But maybe that is what you meant.
 
Dislike ads? Remove them and support the forum: Subscribe to Fastlane Insiders.

rpeck90

Gold Contributor
Speedway Pass
User Power
Value/Post Ratio
442%
Nov 26, 2016
317
1,401
34
United Kingdom
I'm not trying to clone doom, I thought it would be a good challenge to attempt to achieve something similar.

might that be too much of a detour?
Yes it is. I'm not beheld to Ruby2D, I thought it was an interesting library and got carried away with the doom thing.

If really understanding the ins and outs of topics like software rasterization and culling is actually something you care about
This is the case.

with the mindset that they are throwaway code
Exactly what it is.

But maybe that is what you meant.
I need experience with lower level languages/technology/interfaces. I don't know why, it's something I want to do. I know about doom because I've looked at it before and felt I knew enough to recreate the way it worked (maybe not!).

I generally work by trying to get something done and if I come up against a wall, attempt to figure a way around it. The benefit of this is the innovations you (may) create give you a perspective that others don't have.

-

So far I was going to look into raytracing, tile engines and shaders

I took some time to look up about the rendering side of things.

This is what I want to make: -
View: https://www.youtube.com/watch?v=STNqcqLRBgk&ab_channel=Jean-BaptisteYun%C3%A8s

I have no idea whether R2D could handle that. It seems someone has created a similar solution with the SDL library: -
View: https://www.youtube.com/watch?v=-4wngJ-KUF8&ab_channel=EvanLin

If I can recreate the first video, I'll be happy.

Looks like it was based on this tutorial: -

R
 
Last edited:

Andreas Thiel

Silver Contributor
FASTLANE INSIDER
Read Rat-Race Escape!
Read Fastlane!
Read Unscripted!
Speedway Pass
User Power
Value/Post Ratio
112%
Aug 27, 2018
626
702
43
Karlsruhe, Germany
Yes, that sounds reasonable with raycasting as a more modern approach - just a little risky.

The tutorial even mentions the SDL blitting part as a performance consideration, even though - as far as I understand it - they manipulate one surface (frame buffer) and blit only once. Seems even then this can be costly at high resolutions.

A part of my brain wants to jump at this right now and play around, but I think I have to go through my other to dos.

Probably I'd want to break it down into sandbox projects and make sure I understand things well enough so that I can explain what I am doing.
That is why I sometimes write simple "scientific paper" style documents to explain the problem and the solution. If there are gaps I can't close, then I know that I have overextended.
Just diving in with some common sense code and trying to tweak things until it starts to look right would probably not go well for me.
 

Boogie

Bronze Contributor
FASTLANE INSIDER
Read Rat-Race Escape!
Read Unscripted!
Speedway Pass
User Power
Value/Post Ratio
219%
Nov 27, 2014
202
442
Midwest, USA
Since you are interested in maybe someday looking into C/C++ for game programming, I have a resource that was recommended on C++ cast podcast.

In this episode, they interviewed the authors of beautiful C++.

One of the authors who is working on the latest Warhammer game said something to the effect of having seen part of this C++ game programming course that is on youtube and thought it looked good. I'm paraphrasing, BTW. I don't remember his wording. He didn't watch the entire thing. I do remember that. But it was a good enough recommendation that I'll check it out:

View: https://www.youtube.com/watch?v=LpEdZbUdDe4&list=PL_xRyXins848jkwC9Coy7B4N5XTOnQZzz


I have not watched much of it yet. This might be of interest to you since the instructor on youtube says he teaches enough C++ in the first few episodes of the course to be able to do the course.

Also, there are several gaming books out there to help you get started.

One I have looked at a bit is Bob Nystrom's Game Programming Patterns. He has been a game programmer for Electronic Arts for several years. I'm not sure if it will be helpful, but there is a free online version of it here: Game Programming Patterns

What I've seen so far is the application of the GOF patterns material to gaming.

I'm not a game writer, but it's an interesting domain.
 
Dislike ads? Remove them and support the forum: Subscribe to Fastlane Insiders.

rpeck90

Gold Contributor
Speedway Pass
User Power
Value/Post Ratio
442%
Nov 26, 2016
317
1,401
34
United Kingdom
Yes, that sounds reasonable with raycasting as a more modern approach - just a little risky.

The tutorial even mentions the SDL blitting part as a performance consideration, even though - as far as I understand it - they manipulate one surface (frame buffer) and blit only once. Seems even then this can be costly at high resolutions.

A part of my brain wants to jump at this right now and play around, but I think I have to go through my other to dos.

Probably I'd want to break it down into sandbox projects and make sure I understand things well enough so that I can explain what I am doing.
That is why I sometimes write simple "scientific paper" style documents to explain the problem and the solution. If there are gaps I can't close, then I know that I have overextended.
Just diving in with some common sense code and trying to tweak things until it starts to look right would probably not go well for me.
Don't write any code, this thread was mainly a reference for me in the future, no need to put any of your time into it.

Got collisions tentatively working yesterday (some issues regarding clipping), so have been examining the raycasting stuff. Will update if I get anywhere with it. Will have to resume actual work tomorrow so may need to take a break: -

14knLZY.gif


In line with some of the other research I did, it seems there are already several Ruby raycasting implementations:
These are built with Gosu but prove it can be done with Ruby: -


Since you are interested in maybe someday looking into C/C++ for game programming, I have a resource that was recommended on C++ cast podcast.

In this episode, they interviewed the authors of beautiful C++.

One of the authors who is working on the latest Warhammer game said something to the effect of having seen part of this C++ game programming course that is on youtube and thought it looked good. I'm paraphrasing, BTW. I don't remember his wording. He didn't watch the entire thing. I do remember that. But it was a good enough recommendation that I'll check it out:

View: https://www.youtube.com/watch?v=LpEdZbUdDe4&list=PL_xRyXins848jkwC9Coy7B4N5XTOnQZzz


I have not watched much of it yet. This might be of interest to you since the instructor on youtube says he teaches enough C++ in the first few episodes of the course to be able to do the course.

Also, there are several gaming books out there to help you get started.

One I have looked at a bit is Bob Nystrom's Game Programming Patterns. He has been a game programmer for Electronic Arts for several years. I'm not sure if it will be helpful, but there is a free online version of it here: Game Programming Patterns

What I've seen so far is the application of the GOF patterns material to gaming.

I'm not a game writer, but it's an interesting domain.

Thanks for the references! I will check out the video today.

I'm not overly bothered about making a game, I've been fascinated by the techniques behind them for a long time.

I don't think gaming is a "fastlane" business as the competition is cutthroat and your success is mainly dependent on the whims of teenagers. The techniques and technology behind "games", however, are extremely valuable as they can be applied to products which are fastlane.
 

rpeck90

Gold Contributor
Speedway Pass
User Power
Value/Post Ratio
442%
Nov 26, 2016
317
1,401
34
United Kingdom
Update

I got a basic version of perspective implemented.

It needs improving but the fundamentals are there (angles and distances need fixing): -

ZESbGni.gif


I took a time to figure out how to do it and will explain how it works below.

The big break I got was from the following video, which helped me understand how "raycasting" works. My solution is not a "raycaster" but does take inspiration from how it calculates the height of the walls etc: -

View: https://youtu.be/gYRrGTC7GtA?t=907

Raycasters view the shadow of objects, not the objects themselves. This means that what you see on screen isn't a "true" representation of the objects, but an illusion that displays them in "human readable" format.

Each time the player moves, "rays" are shot out across the breadth of the screen (EG 640px) and across the "field of view" (which is typically 60 degrees). Each "ray" is responsible for painting a vertical column of the screen.

The column's composition depends on how much "wall" is present (IE the greater the distance between the player and wall decreases the height of the wall in the column).

The trick means that the screen is always going to be filled with a line of columns. The illusion comes from how those columns are painted - columns representing "distant" walls paint the wall smaller as closer columns.

There is an excellent tutorial about it here:

View: https://www.youtube.com/watch?v=xW8skO7MFYw&ab_channel=javidx9

I spent a long time considering the technique, as well as researching about perspective projection, 3D formulae etc.

Earlier version: -

UjzdCRe.gif

* Only renders the white line presently

I'll explain what I found below: -

--

1. 3D is all about points and vertices.

I went through a LOT of material about 3D game programming.

I discovered that 3D works similarly to 2D except with the dimension of depth. This dimension has to be "spoofed" in the code in order to translate a mathematically 3-dimensional co-ordinate (x,y,z) into a 2D one (x,y).

Decent tutorial outlined it here: -
View: https://www.youtube.com/watch?v=ODztO2gKkyA

The key is that, whilst Ruby2D is a 2-dimensional renderer, it could be used to create "pseudo" 3D environments by manipulating the various points for different quads (or tris if you wanted extra fidelity).

-

2. "True" 3D requires something called the MVP transformation (Model -> View -> Perspective).

This is a set of "matrices" through which you process a series of points to create a 3D vector.

I won't explain the specifics because I don't fully understand them myself -- essentially, you have to convert points from "Model" space (normalized on the model itself) to "View" space (normalized against the world) to "Perspective" space (normalized to the camera)...

MVP.png


I was unable to get this to work so ditched it.

There's a tutorial that explains it here: -
View: https://www.youtube.com/watch?v=p4Iz0XJY-Qk&ab_channel=TheCodingTrain

-

3. I realized my original assumptions were correct

If "real" 3D is taking a series of points/co-ordinates and morphing them into a set of perspective-adjusted 2D points, it means my original idea was valid. The question was how.

This is where my research started to pay off -
  • I realized a digital "3D world" is basically a projection of mathematics through a "camera" object ("viewport" below)...

    projection.png


  • The camera object was entirely comprised of the programmer's mathematics to take a "world" they created and project it onto the 2D screen. This meant that I could create my own "camera" (as the raycaster example I found did).

  • I took inspiration from the C++ raycaster console video above and realized that there were TWO things I had to get right in order to display perspective:-

    a. the "position" of a point on the X axis
    b. the "height" of a point on the Y axis

  • Because the camera is ENTIRELY its own object, I only needed to make code that was relative to it. This meant that I could take the principles laid out in the videos above: -
    • When the player moves, move the camera

    • Infer the player's angle + position (x,y) from the 2D world (painted on left)

    • Use this to create a "Field of View" (FOV) from which I could test to see which points in the 2D world were "visible" to the camera

    • If any point was visible, I would then compute the point's position relative to the camera. IE where in the FOV was the point and how far away was it?

    • With this data, I could then translate each point into a set of co-ordinates to display on the camera "viewport" (red in my app)

    • Because the points would be 2D (IE a top-down line), I had to translate them into 3D. This was done by translating the Y value to Z (IE (10,15) -> (10,0,15)) and using my constants to determine the Y co-ordinate

    • As each line was a wall, I knew it could only have Y co-ordinates at 0 or HEIGHT. Thus, I could create a quad that took the x,y values from the line and project them into a quad

    • This quad is what I would display on the camera's viewport. However, in order to create the illusion of perspective, I would have to blend the Y and Z co-ordinates. This was done by using the "distance" of the camera to the point - which I could use as a means to scale the co-ordinates positions and create the illusion of perspective
The results of what I've created are viewable in the GIF above.

You can view my camera code here: -
I have to do something else presently but may revisit this at a later date to make it work properly.
 

Post New Topic

Please SEARCH before posting.
Please select the BEST category.

Post new topic

Guest post submissions offered HERE.

New Topics

Fastlane Insiders

View the forum AD FREE.
Private, unindexed content
Detailed process/execution threads
Ideas needing execution, more!

Join Fastlane Insiders.

Top